<![CDATA[Home Assistant]]> 2016-12-06T08:21:33+00:00 https://home-assistant.io/ Octopress <![CDATA[0.34: New Remote component, Websockets, Sonarr, GPSLogger]]> 2016-12-03T08:04:05+00:00 https://home-assistant.io/blog/2016/12/03/remote-websockets-sonarr Here we go… 0.34. Let’s call it the “Santa Claus” release. Rudolph was faster than expected and there’s lot’s of goodies on the sleigh. Of course, more work on async programming done by @pvizeli and @balloob, new components, new platforms, major improvements, and much more.

GPSLogger

The work of @dainok let’s you use your Android device, with the Geolocation feature enabled, to track itself using GPS or WiFi networks with the GPSLogger app. GPSLogger can use multiple sources: the passive one just get the latest Android known location, without activating GPS sensors or scanning for WiFi networks.

Remote component

The brand new remote component made by @iandday will simplify the integration of all kinds of remote control units. The first platform for Harmony is included in this release.

HomeMatic

The HomeMatic component has received some updates worth mentioning:

  • Additional services
    • reconnect: Reconnect to your CCU/Homegear without restarting Home Assistant.
    • set_dev_value: Manually control a device, even if it’s not supported by Home Assistant yet.
  • Support for multiple HomeMatic hosts
  • Support for HomeMatic Wired (most devices) and HomeMatic IP (a few devices)
  • Various improvements and fixes, especially for HM-Sec-Key (KeyMatic)

The support for multiple hosts is a result of allowing mixed configurations with wireless, wired, and IP devices. This has the drawback of making the update a breaking change (along with the renamed set_value service). However, the benefits and possibilities gained will be worth it.

Websocket API

This release includes a new websockets based API by @balloob to power the next generation of Home Assistant frontends. The current frontend has been partly migrated to use it and will be further migrated in the future.

All changes

Release 0.34.1 - December 4

This release has a bunch of bug fixes including a big one: emulated_hue will now work with Google Home! We usually reserve patch releases for small bug fixes but we considered this more impactful bug fix so important that we’re including it now instead of having people wait two weeks.

To make the fix backwards compatible (it is a patch release after all) you will have to add two new configuration option to emulated_hue to have it work with Google Home:

emulated_hue:
  type: google_home
  # This is important. Sadly, Google Home will not work with other ports.
  listen_port: 80

We are working on a better solution for 0.35.

Release 0.34.2 - December 5

  • Fix Nest interpreting Celsius as Fahrenheit and converting it (@balloob)
  • Fix Nest sensor platforms throwing errors (@technicalpickles)
  • Frontend will now always show persistent_notification and configurator entities even if not part of the active view (@balloob)
  • Fixed media player cards taking up unnecessary space (@balloob)

Release 0.34.3 - December 6

  • Fix Hook connections (@dasos)
  • Fix random websocket connections (@balloob)
  • Fix Google Home sometimes not finding our emulated_hue (@jawilson)
  • Fix EnOcean config validation (@rubund)

Breaking changes

  • The HomeMatic component now uses a different syntax for hosts and the set_value service has been renamed.
  • All RFXtrx sensors will get a new entity ID.
  • If you are using NGINX, you will have to adapt your configuration.
  • Nest contains changes which will require your attention.

If you need help…

…don’t hesitate to use our Forum or join us for a little chat. The release notes have comments enabled but it’s preferred if you use these communication channels. Thanks.

Reporting Issues

Experiencing issues introduced by this release? Please report them in our issue tracker. Make sure to fill in all fields of the issue template.

]]>
<![CDATA[0.33: New Calendar component, Wink thermostats and Cisco IOS]]> 2016-11-20T00:04:05+00:00 https://home-assistant.io/blog/2016/11/20/calendar--wink-thermostats--cisco-ios For this release we put a lot of focus on finishing our async upgrade and fix a bunch of bugs in the process.

But a new release wouldn’t be awesome if it didn’t had some new goodies and this release is no different. This release includes a new calendar component by @mnestor. It comes now with Google Calendar support, which should allow you to automate things based on your calendar events!

Changes

Release 0.33.1 - November 20

Release 0.33.2 - November 22

Release 0.33.3 - November 23

  • Update Yr.no entities every hour (@kellerza)
  • Bump Netdisco to 0.7.7 (fixes discovery on Synology)
  • Fix discovery race condition (most obvious in Wemo) (@balloob)

Release 0.33.4 - November 24

  • Set executor pool size to 10 (as intended) (@pvizeli)

This should fix occasional performance problems that some people have reported.

Breaking changes

  • We have included a fix that impacts how we generate entity ids. This only impacts devices with accented characters. Instead of being stripped out, they are now replaced with the non-accented version. So now Tèst Mörê will become test_more instead of tst_mr.
  • Command line switches will now use the specified object ID for their entity ID instead of basing it off the name.

Reporting issues

Experiencing issues introduced by this release? Please report them in our issue tracker. Make sure to fill in all fields of the issue template.

]]>
<![CDATA[0.32: Hacktoberfest, InfluxDB sensor, Error reporting, and Weather]]> 2016-11-05T03:04:05+00:00 https://home-assistant.io/blog/2016/11/05/hacktoberfest-influxdb-weather Another two weeks have passed and we are pleased to present Home Assistant 0.32.

Hacktoberfest

The Hacktoberfest is over now. Home Assistant made the 2nd and the 3rd place out of almost 30’000 participating repositories with a total of 528 pull requests closed - that’s an average of 17 pull requests a day! Thanks to all the contributors but also to the team of reviewers. This wouldn’t been possible without you 👏 .

Improved error reporting

This release has improved the reporting when a config validation error occurs. Thanks to @kellerza you will now get a persistent notification added to your UI when this happens.

Asynchronous

This release contains the first asynchronous sensor and camera platforms. @pvizeli and @fabaff ported most of the “internal” sensors to async programming. We hope that you will enjoy the new speed.

@balloob and @pvizeli worked a lot on the improvement of the core itself.

Weather component

For a long time we have had a bunch of weather sensors but it’s getting better: There is now a Weather component. Sorry, not much more to tell right now. The plans are to create a weather UI element and to improve the initial implementation.

All changes

Release 0.32.1 - November 6

We’ve added a warning to 0.32 to catch platforms accidentally slowing down Home Assistant. Our aim is to fix these quickly when reported, so here is 0.32.1 with all reported platforms fixed.

  • Fix Sonos doing I/O inside the event loop (@pvizeli)
  • Fix Radiotherm doing I/O inside the event loop (@balloob)
  • Fix camera MJPEG streams when using HTTP 1.0 (@balloob)

Release 0.32.2 - November 7

  • Move Honeywell I/O out of the event loop (@balloob)
  • Use sequential updates for non-async entities to prevent race conditions (@pvizeli)
  • Fix setting temperature in Celsius on Radiotherm CT50 thermostats (@andyat)
  • Fix PiLight config validation (@DavidLP)

Release 0.32.3 - November 11

  • Fix OpenWeather weather platform doing I/O in event loop (@lwis)
  • Fix Alarm.com doing I/O in event loop (@jnewland)
  • Fix Tellstick doing I/O in event loop (@balloob)
  • Fix KNX doing I/O in event loop (@balloob)
  • Increase warning threshold for catching platforms that do I/O (@balloob)
  • Change pilight systemcode validation (@janLo)
  • Fix Yamaha discovering already configured receivers (@sdague)
  • Fix Sonos from installing dependency each time HA was started (@pvizeli)
  • Fix Synology camera SSL and error handling (@pvizeli)
  • Fix Panasonic Viera doing I/O in event loop (@balloob)
  • Improve generic camera error handling (@kellerza)
  • Light - Flux Led Lights: allow specifying mode if light does not support white mode (@DanielHiversen)
  • Fix Rest switch default template (@pvizeli)

Release 0.32.4 - November 15

  • Fix device tracker from crashing HASS when a new device was discovered (@balloob)
  • HTTP: Fix X-Forwarded-For feature (@mweinelt)

Misc

Our website has now an additional category called “Ecosystem”. This will become the place where tools, apps, and other helper for the Home Assistant ecosystem can store their documentation or guides.

Breaking changes

  • The Yahoo Finance platform supports now multiple stock. Please adjust your configuration.
  • Deprecated components garage_door, rollershutter, thermostat, and hvac have been removed.
  • The minimum Python version on Windows has been bumped to Python 3.5.
  • The Insteon Hub integration has been disabled due to a request from Insteon.

If you need help…

…don’t hesitate to use our Forum or join us for a little chat. The release notes have comments enabled but it’s preferred if you the former communication channels. Thanks.

]]>
<![CDATA[Explaining the Updater]]> 2016-10-25T04:30:00+00:00 https://home-assistant.io/blog/2016/10/25/explaining-the-updater On Saturday, we released Home Assistant 0.31 which includes an improved updater component that checks for new versions using the Home Assistant servers. We wanted to update the community on its rollout and answer some questions that have come up. As part of the update check anonymous information about your operating system and Python version is submitted to Home Assistant servers unless you have opted out.

Why we changed the updater

This change was driven by two important factors.

Improving the security of the users.

As a user, you will be able to be notified if you are running a Home Assistant version that includes components that have known security flaws.

Although we hope to not have to use this feature often, it is important for us to be able to reach out to impacted users. We had the need for such a feature once in the past. Due to a bug the forecast.io sensor was making a huge amount of API requests causing some of our users to get charged because they went over the free quota.

Please note that this functionality is not done yet but will be available in a future release.

Focusing our resources where it matters

As developers of Home Assistant, we will be able to see in what kind of environments Home Assistant is running. Here’s a few data points we didn’t have until now:

  • Total number of instances
  • Which operating systems versions and flavors are in use
  • Python version
  • What option is more popular: Docker, Virtualenv or bare metal installs?
  • How popular is our new Raspberry Pi image?

Why we look up your IP address with GeoIP

We store the city so that we can see where our users are from. This information will be used to give us a better insight in where our users are from. This will help us gather data to see if we should for example prioritize internationalization. In addition, we previously had a nasty bug with the sun component in which users above a certain latitude were having crashes multiple times a day. Had the updater component been in place we could have targeted a special priority update notification only to them.

As stated in the release blog post, the location information is not provided by your local Home Assistant installation but is instead gathered by comparing your IP address against the GeoLite2 data created by MaxMind. From their documentation:

IP geolocation is inherently imprecise. Locations are often near the center of the population. Any location provided by a GeoIP database should not be used to identify a particular address or household.

Why is it enabled by default

We decided to have it enabled by default because we consider the information that is gathered not harmful. We understand that not everyone will agree with us and so we have provided multiple ways to opt out.

It is in our short-term planning to add an option to control this to our frontend.

Source Code

The source code of our updater AWS Lambda function is now available here.

]]>
<![CDATA[0.31: Reading you the news, some serious business, spooky hackery and a breaking Z-Wave change]]> 2016-10-22T20:00:00+00:00 https://home-assistant.io/blog/2016/10/22/flash-briefing-updater-hacktoberfest Hello again friend,

How are you? Having a good day? We sure are. If you aren’t having a good day, this might cheer you up…

Every other weekend around here gets a little hectic leading to a big sigh of relief as we release a new version of Home Assistant to the world. And this time is no different. Our developer community has once again built us a beautiful new release with lots of new features and improvements. We hope you like it.

One last thing before we get going though, I should warn you… @balloob got a bit lazy this week and let me (@robbiet480) step up to the plate again to write the blog post and do the release. I guess I didn’t do such a bad job in 0.27. You’ll never know what surprises I have in store. Now that i’ve got all that stuff out of the way, let’s get started…

Stats Update

Sadly, no big amazing stats to update you with this time, but we did recently pass 7,000 commits! This release featured submissions from 45 contributors. Hopefully with the new updater component we will be able to give you some really good stats in the 0.32 blog post.

Hacktoberfest

Hacktoberfest logo

October means Hacktoberfest time and our community has really come through with some excellent improvements and additions. As of this writing, we have 194 merged and 41 open pull requests to the home-assistant repository and 209 merged/28 open pull requests submitted to the home-assistant.github.io repository. If you want to get in on the fun check out our Hacktoberfest blog post or the Hacktoberfest website. You get an awesome t-shirt for free if you have 4 pull requests merged in the month of October! We even have tasks that a non-developer can easily accomplish with a tiny bit of work. Better hurry up though, only 9 days left and most of the easy tasks are gone!

⚠️ A greatly improved updater component (Please read this!) ⚠️

This release includes an update to our updater component. The responsibility of the updater component is to check if a new version is available and notify the user if this is the case.

It used to be that this component would check with PyPi (the Python package manager) to see if a new update was available. This had a couple of problems:

  1. We are unable to do a slow rollout
  2. We are unable to show the user extra information (like a link to a changelog or the release date)
  3. We are unable to warn users for critical security updates

So to work around these problems, we decided to start hosting the version check service ourselves. Since we had to get some infrastructure spun up anyway, we figured we would take it a step further. Which leads me to this bit of the update (the most important part):

What you need to know (the important bit!)

Remember how I mentioned that up there in the title that there is some serious business in this release? Well, we also added some basic analytics to the updater component which get sent to the server and stored so that we get a better idea of our user base.

Each Home Assistant instance running the updater component will generate a unique ID (based on UUIDv4) that will be used for the updater to be able to differentiate between instances. This UUID will be stored in your config directory in a file called .uuid.

Opting out

There are two ways to opt-out. The first way is by using the new opt_out option for the updater. This way the updater will continue to check for updates, but no information about your system will be shared with us.

updater:
  reporting: no

You can also disable the updater component entirely by removing updater: from your configuration.yaml although we would not suggest you do this as you would miss any critical updates.

Finally, you can also reset your unique identifier by deleting the .uuid file and restarting Home Assistant.

Data stored on the Home Assistant update server

Here is what my production Home Assistant instance looks like from the server side:

Name Description Example
arch CPU Architecture x86_64
distribution Linux Distribution name (only Linux) Ubuntu
docker True if running inside Docker false
os_name Operating system name Darwin
os_version Operating system version 10.12
python_version Python version 3.5.2
timezone Timezone America/Los_Angeles
user_agent User agent used to submit analytics python-requests/2.11.1
uuid Unique identifier 10321ee6094d4a2ebb5ed55c675d5f5e
version Home Assistant version 0.31.0
virtualenv True if running inside virtualenv true

In addition to the above collected data, the server will also use your IP address to do a geographic IP address lookup to determine the city that you are from. To be extremely, extremely clear about this bit: The Home Assistant updater does not: store your IP address in a database and also does not submit the location information from your configuration.yaml.

Geo-lookup on my IP resolves to Oakland with latitude/longitude pointing at the geographical center of the city.

The server also adds two timestamps to the data: the original date your instance UUID was first seen and the timestamp of the last time we have seen your instance. This gives us the following extra data:

Name Description Example
first_seen_datetime First time instance ID was submitted 2016-10-22T19:56:03.542Z
geo_city GeoIP determined city Oakland
geo_country_code GeoIP determined country code US
geo_country_name GeoIP determined country name United States
geo_latitude GeoIP determined latitude (of the city) 37.8047
geo_longitude GeoIP determined longitude (of the city) -122.2124
geo_metro_code GeoIP determined metro code 807
geo_region_code GeoIP determined region code CA
geo_region_name GeoIP determined region name California
geo_time_zone GeoIP determined time zone America/Los_Angeles
geo_zip_code GeoIP determined zip code 94602
last_seen_datetime Most recent time instance ID was submitted 2016-10-22T19:56:03.542Z

This data is held in the highest security. The update system runs in a secured Amazon Web Services account owned by me (@robbiet480). I personally have 5 years of experience with complex AWS deployments and have an extensive security background. I have audited the entire system and made sure to take every step to protect the data, including limiting who has access (just @balloob and myself). While not directly personally identifiable we absolutely understand some users hesistance to giving this information out. Please understand that we are only collecting this information to better understand our user base to provide better long term support and feature development then is currently possible.

We currently have no plans to publicly expose any of this information. If we did do such a thing in the future we would of course notify you in advance. It must also be stated that we will never sell or allow the use of this information for non-Home Assistant purposes.

We thank you for understanding why we are collecting this data and hope that you leave the feature enabled but fully understand if you feel uncomfortable with this.

This section was updated on October 24 to be more clear about geo-lookups being on the city level. See original version.

Now, back to the fun stuff…

Good evening. I’m Ron Burgundy and here’s what happening in your world tonight.

Home Assistant got a crazy idea recently that it couldn’t do enough already and wanted to challenge itself even more. I really don’t understand how it came up with this kooky idea, but it now thinks that its newest hobby should be a minor career in journalism.

0.31 adds support for the brand spanking new Alexa Flash Briefing API, allowing you to get updates from Home Assistant anytime you ask Alexa to read your flash briefing. What’s the use case you ask? Well, now when I wake up in the morning and get my flash briefing, Home Assistant adds this to the end of it for me:

Drive time with traffic is 35 minutes. There is an UberPOOL that will cost $11.52, estimated to be 2 minutes away, for a total of 37 minutes. BART is currently estimated to take 29 minutes. You should take BART, as it is estimated to be faster by 8 minutes.

Now I know how to best get to my real job (no, Home Assistant is not my real job, it does seem like it sometimes though) every morning. Obviously not the best home automation example, but I think you get the idea. I could see this being used to tell you any major events that happened in your home overnight or reading you your hyperlocal weather report. Thanks to the audio support you could even replace all of the default Alexa Flash Briefing sources with your own news feeds. Home Assistant supports both text and audio content as well as displaying data in the Alexa app. I also want to point out that unlike the existing Skill integration, the Flash Briefing API does not require HTTPS (but you should still be using HTTPS if possible). For more information, check out the new docs.

You stay classy, San Diego. (It’s funny, because balloob lives in San Diego))

Major breaking Z-Wave changes ahead

A rather nasty Z-Wave issue was discovered recently by @lukas-hetzenecker. There was a somewhat large chance that if you had multiple of the same model Z-Wave device they may both try to use the same entity IDs. To fix the issue the internal Z-Wave index is now appended to the end of all Z-Wave entity IDs.

What this means for all you Z-Wave users is that you will need to update your configurations to reflect the change. I personally have quite a few (17) Z-Wave devices and went through the process this week. Here’s what I had to do:

  • Update customizations
  • Update groups
  • Update my zwave.customize section
  • Update my Alexa skills that used old entity IDs
  • Because I use emulated_hue with Alexa and emulated_hue uses the entity ID as a unique identifier I also had to remove all Z-Wave devices from Alexa and re-add them.

Your todo list may be a little different from mine, I just wanted to outline the steps I took to give you an idea of what you need to think about. It’s not a very hard process, especially when using global find and replace in Sublime Text but did take me about 20 minutes to complete.

This is super annoying, I know, especially since we had said in 0.12 that Z-Wave IDs should hopefully never change again, but we are now forced to eat those words. I will state again that Z-Wave IDs shouldn’t change in the future but obviously we see how that went. To sum up on this section… sorry but it had to happen.

All changes

Release 0.31.1 - October 24

  • Identify special character encoding error in YAML files (@kellerza, @lwis)
  • iOS app component bug fixes (@robbiet480)
  • Fix a spelling problem on user-facing error (@robbiet480)
  • YAML includes will ignore dirs/files prefixed with . (@lwis)

Breaking changes

  • The HTTP component now takes a different format for authenticating IPs
  • Configuration format has changed for Proximity
  • The Arduino platform are now covered by the configuration check. Please check the documentation to see how.
  • The Z-Wave entity ID change mentioned above

If you need help…

…don’t hesitate to use our Forum or join us for a little chat. The release notes have comments enabled but it’s preferred if you the former communication channels. Thanks.

Until next time

Thanks for reading all of the above, especially since this week was a pretty long post. We should be back with a new post around November 5th announcing the arrival of 0.32.

– Robbie

]]>
<![CDATA[0.30: More Async, HASSbian, Digital Ocean, statistics, REST]]> 2016-10-08T03:04:05+00:00 https://home-assistant.io/blog/2016/10/08/hassbian-rest-digital-ocean Yes, after only nine days comes 0.30. Don’t worry, we will try to keep our usual release cycle and not start to release every day.

We guess that you already know: The Raspberry Pi image is available now. For Hassbian, @Landrash has combined the most essential parts for a Home Assistant setup in an easy-to-use image for the Raspberry Pi device family. Hassbian is quite young, thus we are looking forward to recieve feedback, issue report, and suggestions to improve it.

A large amount of resources of the development are still focusing on the effort to move Home Assistant further to asynchronous programming. It’s a labor-intensive task, comes with segmentation faults, and unstable instances when certain combinations of sensors are used. The benefit will be more speed in the near future.

To reduce the run-time of your tests, @balloob did a lot of tweaking. For now the RFXtrx tests are excluded which cut the needed time for running on your Pull Request in half.

Documentation

All configuration sample entries are now minimized. This should help to avoid problem for starters and newbies as they only get what’s needed and not a full sample with all optional entries. If there is an issue with an entry in your configuration.yaml file the error message will provide you an URL that point to the documentation.

As soon as the Hacktoberfest started there were a lot of incoming Pull Requests for the documentation. A huge “Thank you” to all participants. Especially, we would like to give a cookie to @hillaryfraley. She created around a dozen Pull Requests so far and didn’t only fix typos but complete sections. The Hacktoberfest is still on-going and we are looking forward to get more Pull Requests.

Statistics

With the statistics sensor we would like to introduce a new sensor that is similar to the template sensor or the trend sensor. This sensor is consuming values from another sensor and is doing some statistical analysis of the data. Over a group of samples is the average/mean, the min/max, the total, the standard deviation, and the variance calculated which can be used in your automation rules. If the source is a binary sensor then the state changes are counted.

As the results are processed on-the-fly you still need to use the data from your database for a in-depth analysis of your stored information. Check the latest notebook for doing statistics with your Home Assistant database.

REST! We don’t…

There was a lot of work done on our implementation which are working with RESTful APIs. @w1ll1am23 extended the aREST platforms to display if an aREST unit is available or not. The aREST implementations are now covered by the configuration check as well. Please check the Breaking changes section for more details.

The REST sensor supports now HTTP authentication (basic and digest) and custom headers. This will allow you to access resources which are protected. This sample sensor will access GitHub and retrieve the latest release number while by-passing the rate limit for non-authenticated requests.

sensor
  - platform: rest
    resource: https://api.github.com/repos/home-assistant/home-assistant/releases/latest
    username: YOUR_GITHUB_USERNAME
    password: YOUR_GITHUB_ACCESS_TOKEN
    authentication: basic
    value_template: '{{ value_json.tag_name }}'
    headers:
      Accept: application/vnd.github.v3+json
      Content-Type: application/json
      User-Agent: Home Assistant REST sensor

Misc

  • GitHub released with a recent update a review feature. This will give you more control over your comments while you review an open Pull Request.
  • Thanks to @robbiet480 we are now running mention-bot. It will help you when you create a new Pull Request to identify potential reviewers.
  • The Home Assistant Community Forum has now an additional section called “Installation”.

All changes

Release 0.30.1 - October 8

  • Device Tracker known_devices.yaml validation is now more accepting (@kellerza)
  • Handle X10 light numbers greater than 9 (@mtl010957)
  • Fix command line covers without a template (@roidayan)

Release 0.30.2 - October 12

  • Handle Volvo’s with dashes in their name (@molobrakos)
  • Fix some html5 push notification configuration options were discarded after first use (@T3m3z)
  • Fix Homematic device name with autodiscovery (@pvizeli)
  • Make ‘pin’ optional for zigbee device config (@flyte)
  • Fix when sending a notification to a service with target attached (i.e. notify.html5_unnamed_device_2) the target was not submitted to the platform as a list causing iteration over every character in the string. (@robbiet480)
  • Fix for Slack targets (@fabaff)
  • Fix for Pushover targets (@Nixon506E)

Breaking changes

  • All deprecated condition options from automation have been removed (deprecated since May and have printed warnings to your console):
    • use_trigger_values is gone. You have to copy your triggers to conditions and adjust for the correct config.
    • condition_type is gone. Use condition: or instead.
    • To specify the type of a condition, use condition: instead of platform:.
  • The Forecast.io was renamed to Dark Sky. Replace your - platform: forecast with - platform: darksky.
  • The aREST configuration between the sensor and the switch platform was aligned.

If you need help…

…don’t hesitate to use our Forum or join us for a little chat. The release notes have comments enabled but it’s preferred if you the former communication channels. Thanks.

]]>
<![CDATA[Participating in Hacktoberfest]]> 2016-10-02T00:04:05+00:00 https://home-assistant.io/blog/2016/10/02/hacktoberfest Home Assistant will join this year for Hacktoberfest, an event organised by DigitalOcean and GitHub to support and celebrate open source. The idea is that open source projects like Home Assistant will gather a bunch of entry-level bugs, features and documentation enhancements and that you, a current or future contributor, will fix them. If you submit four pull-requests during the month of October you will have earned yourself a limited edition Hacktoberfest T-shirt!

Why contribute to Home Assistant:

  • Written in Python3 with 94% test coverage
  • Active and helpful community
  • Friendly to new contributors

Resources to get started:

Are you not a programmer but still want to contribute to Home Assistant? Check out our list of entry-level issues for the Home Assistant website.

Hacktober fest logo

]]>
<![CDATA[We have a Raspberry Pi image now]]> 2016-10-01T05:00:00+00:00 https://home-assistant.io/blog/2016/10/01/we-have-raspberry-image-now Today we’re happy to announce our brand new Raspberry Pi image! It is based on Raspbian Lite combined with HASS so we decided to call it Hassbian.

This image comes pre-installed with everything you need to get started with Home Assistant right away.

To get started, check out the installation instructions in the getting started section or watch the latest video by BRUHAutomation:

Under the hood

It’s based on Raspbian Lite and generated with a fork of the same script that builds the official Raspbian images. For installation of HASS it follows the same install instructions as the Manual installation. Please note that this project has no association with the Raspberry Pi foundation or their projects.

On first boot the latest release of Home Assistant will be installed and can be reached after 3~5 minutes. Pre-installed on this image is the MQTT broker Mosquitto, Bluetooth support and settings for the homeassistant account to use the GPIO pins of the Raspberry Pi. Mosquitto is not activated by default.

As it is today there is no pre-compiled Z-Wave support but it can be installed by following the Getting started instructions for Z-Wave.

Happy Automating!

]]>
<![CDATA[0.29: 🎈 Async, SleepIQ, OpenALPR, EmonCMS, stocks, and plants]]> 2016-09-29T03:04:05+00:00 https://home-assistant.io/blog/2016/09/29/async-sleepiq-emoncms-stocks Two weeks ago, September 17 marked our 3 year anniversary. In this time Home Assistant managed to grow from a simple script that turned on my lights when the sun set to a kick ass open source project with the best community an open-source project could wish for. This release contains features, bug fixes and performance tweaks by a total of 50 different people! We have also managed to cross the 1000 forks on GitHub. Talking about momentum!

This is a big release as we’ve completely overhauled the internals of Home Assistant. When I initially wrote Home Assistant, still figuring out the ins and outs of Python, I went for an approach that I was familiar with for an application with many moving parts: threads and locks. This approach has served us well over the years but it was slower than it needed to be, especially on limited hardware.

This all changed when @bbangert came around and took on the tough job to migrate the core over to use asynchronous programming. He did an amazing job and I am happy to say that the initial port has been done and is included in this release! On top of that, we have been able to keep our simple and straightforward API at the same time. We are still in the process of migrating more and more components over to the asynchronous API, so expect more speedups and awesome features in the upcoming releases.

SleepIQ and OpenALPR

There now is support for two new super cool things: Beds and license plates. @technicalpickles created a SleepIQ component that let you monitor the sensor data of your bed. @pvizeli has added license plate recognition based on OpenALPR! This means that you can now be notified about which car is parked on your driveway or in your garage. I also would like to use this opportunity to give a big shoutout to @pvizeli for being such an awesome member of our community. He joined us at the end of June and has helped crush bugs and add awesome features ever since (65 pull requests already!).

Configuration validation

On the voluptuous front we have also made great progress. We were able to fully remove the legacy config helpers and have migrated 323 of the 346 components and platforms that needed migrating! This does mean that for some components the configuration has slightly changed, make sure to check out the breaking changes section at the bottom for more info. Thanks everybody for reviewing the Pull requests, testing the changes, and reporting issues.

Delayed Release

As you might have noticed, this release has been delayed by 5 days. This was due to a rare, difficult to reproduce problem with the Python interpreter. A huuuuge thanks to all the people that have helped countless hours in researching, debugging and fixing this issue: @bbangert, @turbokongen, @lwis, @kellerza, @technicalpickles, @pvizeli, @persandstrom and @joyrider3774. I am grateful to have all of you as part of the Home Assistant community.

Hide automation rules

Since 0.28 automation rules can be reloaded directly from the frontend. By default all automation rules are shown. If you want to hide an automation rule, use hide_entity: True.

All changes

Hotfix 0.29.1 - September 29

Hotfix 0.29.2 - September 29

Hotfix 0.29.3 - September 29

Hotfix 0.29.4 - September 30

Hotfix 0.29.5 - September 30

Hotfix 0.29.6 - October 1

  • Fix segmentation fault (@bbangert) 🎉
  • Fix nested templates in data_template would incorrectly get cached (@balloob)

Hotfix 0.29.7 - October 5

  • Fix handling SIGTERM and SIGHUP signals (fixes Systemd restart issues) (@pvizeli)

Breaking changes

  • The template methods now and utcnow have been changed from variables to methods. To get the current time replace now with now().
  • yahooweather default name is now yweather. Also min and max temperature are now correctly called Temperature Min and Temperature Max.
  • ffmpeg is now a component for manage some things central. All ffmpeg_bin options have moved to this compoment from platforms.
  • Config has changed for X10 lights.
  • For Wink, make sure your config only contains the access token as in the docs.
  • Nest sensor ‘mode’ has been renamed to ‘operation_mode’

If you need help…

…don’t hesitate to use our Forum or join us for a little chat. The release notes have comments enabled but it’s preferred if you the former communication channels. Thanks.

]]>
<![CDATA[0.28: Reload automation and groups, API documentation, car tracking, Pi-Hole stats]]> 2016-09-10T06:00:00+00:00 https://home-assistant.io/blog/2016/09/10/notify-group-reload-api-pihole It’s already time for 0.28 thanks to our super short release cycles. Now, it’ official…we hit 4000 stars on Github. That’s amazing. Sorry, not as amazing as all the stuff that was going on for 0.27 but still pretty awesome.

Reload automation rules

This release brings you a huge improvement of the automation and group handling. Both can be reloaded without a Home Assistant restart by calling their new reload services. The automations can be controlled directly from the frontend.

Raspberry Pi installation guide

Singleboard computers are very popular to run Home Assistant. To support this fact, the installation documentation for the Raspberry Pi devices was re-written to get users started as quickly as possible. @Landrash took the lead with on this tasks with help from @kellerza and @MartinHjelmare.

Climate and cover

There are countless bugfixes included in this release which will make your experience with the climate and the cover platforms better. Two week ago was the biggest merger of implementations released that ever happened in the history of Home Assistant. Thanks to @turbokongen, @pvizeli, @djbanks, @danielperna84, and others the improvements on the code and the frontend side is continuing…

API documentation

The Home Assistant API Documentation is a great addition to the already exisiting user documentation. The focus is not end-users but developers who whant to get details about the code without actually browsing the code on Github.

Configuration validation

The validation of the configuration is still on-going. Approximatly 80 % is done. This means that we will propably talk about this topic in the next release notes again. To align the configuration of components and platforms we needed to break some. Please refer to the Breaking changes section to check if you need to update your configuration or simple check your log for configuration validation errors. Thanks to @kellerza, @fabaff, @Teagan42, and @pvizeli for your effort!

All changes

Hotfix 0.28.1 - September 12

  • Fix: Simplisafe alarm control panels accept any string for code (@tchellomello)
  • Fix: Z-Wave would sometimes not detect all thermostats (@turbokongen)
  • Fix: Automatic device tracker when 2 or more cars are tracked (@teagan42)
  • Fix: Group ordering is now based on config again (@balloob, @kellerza)

Hotfix 0.28.2 - September 13

  • Light - pilight: Fix send RF code (@DavidLP)
  • Recorder: Fix specifying SQLite (@pvizeli)
  • Wink: Fix garage door detection (@turbokongen)
  • Climate - Ecobee: Fix inverted high and low temperatures (@turbokongen)
  • Allow changing covers using scenes (@nvella)
  • Device tracker - Automatic: Fix polling (@teagan42)

Breaking changes

  • OpenweatherMap entity IDs are now like sensor.owm_temperature. Previously they were like sensor.weather_temperature. Apologies for this change, but we needed to make OpenWeatherMap more generic now that we have many weather platforms.
  • Updates of configuration variables due to configuration check or alignment with other platforms. Please update your configuration entries according to the documentation:
  • Custom components extending BaseNotificationService need to be aware that kwargs.get(ATTR_TITLE) will now return None if a title has not been set, and will need to specify kwargs.get(ATTR_TITLE, ATTR_TITLE_DEFAULT) if they always require a title.

If you need help…

…don’t hesitate to use our Forum or join us for a little chat.

]]>
<![CDATA[ESP8266 and MicroPython - Part 2]]> 2016-08-31T04:17:25+00:00 https://home-assistant.io/blog/2016/08/31/esp8266-and-micropython-part2 So, part 1 of ESP8266 and MicroPython was pretty lame, right? Instead of getting information out of Home Assistant we are going a step forward and create our own sensor which is sending details about its state to a Home Assistant instance.

Beside HTTP POST requests, MQTT is the quickest way (from the author’s point of view) to publish information with DIY devices.

You have to make a decision: Do you want to pull or to poll? For slowly changing values like temperature it’s perfectly fine to wait a couple of seconds to retrieve the value. If it’s a motion detector the state change should be available instantly. This means the sensor must take initiative.

An example for pulling is aREST. This is a great way to work with the ESP8266 based units and the Ardunio IDE.

MQTT

You can find a simple examples for publishing and subscribing with MQTT in the MicroPython library overview in the section for umqtt.

The example below is adopted from the work of @davea as we don’t want to re-invent the wheel. The configuration feature is crafty and simplyfies the code with the usage of a file called /config.json which stores the configuration details. The ESP8266 device will send the value of a pin every 5 seconds.

import machine
import time
import ubinascii
import webrepl

from umqtt.simple import MQTTClient

# These defaults are overwritten with the contents of /config.json by load_config()
CONFIG = {
    "broker": "192.168.1.19",
    "sensor_pin": 0, 
    "client_id": b"esp8266_" + ubinascii.hexlify(machine.unique_id()),
    "topic": b"home",
}

client = None
sensor_pin = None

def setup_pins():
    global sensor_pin
    sensor_pin = machine.ADC(CONFIG['sensor_pin'])

def load_config():
    import ujson as json
    try:
        with open("/config.json") as f:
            config = json.loads(f.read())
    except (OSError, ValueError):
        print("Couldn't load /config.json")
        save_config()
    else:
        CONFIG.update(config)
        print("Loaded config from /config.json")

def save_config():
    import ujson as json
    try:
        with open("/config.json", "w") as f:
            f.write(json.dumps(CONFIG))
    except OSError:
        print("Couldn't save /config.json")

def main():
    client = MQTTClient(CONFIG['client_id'], CONFIG['broker'])
    client.connect()
    print("Connected to {}".format(CONFIG['broker']))
    while True:
        data = sensor_pin.read()
        client.publish('{}/{}'.format(CONFIG['topic'],
                                          CONFIG['client_id']),
                                          bytes(str(data), 'utf-8'))
        print('Sensor state: {}'.format(data))
        time.sleep(5)

if __name__ == '__main__':
    load_config()
    setup_pins()
    main()

Subscribe to the topic home/# or create a MQTT sensor to check if the sensor values are published.

$ mosquitto_sub -h 192.168.1.19 -v -t "home/#"
sensor:
  - platform: mqtt
    state_topic: "home/esp8266_[last part of the MAC address]"
    name: "MicroPython"

@davea created sonoff-mqtt. This code will work on ESP8622 based devices too and shows how to use a button to control a relay.

]]>
<![CDATA[0.27 is here to break eggs and take names: notifications, Hue fakery, safety and unification come to Home Assistant]]> 2016-08-28T03:30:25+00:00 https://home-assistant.io/blog/2016/08/28/notifications-hue-fake-unification This week’s blog post could only be possibly described by exactly one hashtag:

#Amazing

or maybe#supersized

Keep reading to see what #Amazing things we have in store for you this week 😄! And make sure you read all the way to the end, because I left a present down there for those committed few among you :)

But first…

Some general housekeeping

Paulus (@balloob) is on vacation in Europe this week, so you will all have to deal with me, Robbie (@robbiet480) for this release blog post. Don’t worry, Paulus will be back to tearing apart your pull requests in no time 😈.

Special thanks to my awesome helpers for this week’s release who are looking over my shoulder to make sure I’m crossing my t’s and dotting my i’s: @Teagan42, @infamy and @fabaff.

For my next trick, let’s hand out some…

Trophies

I felt that I had to 1-up Paulus (@balloob) somehow with his 500,000 pageviews stat he shared in the 0.26 blog post, so I pushed myself and our development community as a whole super hard the last two weeks to put a lot of love into Home Assistant to bring you not just one, but six #Amazing stats for this release. As of 0.27, we have now surpassed the following milestones:

In addition,

Now that we have that great news out of the way, onto this week’s release which is going to keep the #Amazing gravy train rolling right along and get to the stuff you all really are here for.

0.27

While this release is #Amazing, we had to break a few eggs (now you understand the title reference!) to make a beautiful omelette (using home automation obviously) so some platforms and components have needed to introduce breaking changes. Please make sure to read the Breaking Changes section below.

Hue Bridge Emulation

Thanks to @mgbowen we now have the functionality previously provided by @blocke’s ha-local-echo built right into Home Assistant! This means that for those of you with devices that either lack or have a subpar integration with Home Assistant (looking at you Amazon Echo) you can now have a better experience by having your Home Assistant pretend to be a Hue Bridge. Personally, I have used @auchter’s Haaska previously but found that it was slow to respond and sometimes failed entirely. With the new emulated_hue component, you can have local control of entities through Amazon Echo.

Notification improvements

We have some excellent upgrades to the notification system coming to you in 0.27, courtesy of me, @robbiet480.

HTML5 Push Notifications

This release adds support for HTML5 push notifications on Chrome/Firefox/Opera on both desktop and Android devices. This means that you can send a notification to your phone even when your Home Assistant is not open in your mobile browser. When using Chrome you can even include 2 action buttons so that you can control your Home Assistant from your phone’s lock screen, allowing you to do things like sound alarms or unlock your front door, all without leaving the notification. Thanks again to me (@robbiet480) and Paulus (@balloob) for all the hard work on this!

Notification Groups

Using the new notify group platform allows you to cut down a lot of duplicate automation logic by combining multiple notification platforms and targets into a single notify service. Check out the docs for more info.

target is no longer needed!

For platforms that support it, starting with the new HTML5 platform, any targets that are available will be exposed as individual services, so no more having to remember which targets to use. Please note that the existing services also still exist so you can keep using target if you wish.

Validate configuration before restarting Home Assistant

Ever restarted Home Assistant to test a configuration change just to find out there is a validation error? Well, not anymore! @kellerza has added a command line script that will validate your configuration as if you started Home Assistant.

$ hass --script check_config

Configuration validation

This release includes a big push on making sure all platforms contain proper configuration validation. This should help in getting your configuration right. Thanks to @fabaff, @pavoni, @pvizeli, @nkgilley for all the hard work on this, you all rock!

FFMpeg motion/noise sensing

It’s now possible to use FFMpeg to monitor a video stream and detect motion thanks to a new binary sensor platform by @pvizeli.

Component clean up - Thermostat & HVAC -> Climate. Rollershutter & Garage Door -> Cover.

Due to our wild growth we ended up with a few components that had a lot of overlapping functionality. @turbokongen took on the hard job on merging them. Thermostat and HVAC platforms are now combined under the new Climate component. Rollershutter and Garage Door platforms are now combined under the new Cover component. You can easily upgrade by just swapping out the name. For example replace thermostat with climate. The old components have been deprecated and will be removed in the near future.

A new fan component

Along with the new climate component, @Teagan42 and I (@robbiet480) decided we needed something simpler to just control a fan. Currently it has support for controlling Insteon fans. MQTT support will appear in 0.28.0. I tried to get it implemented before 0.27.0 but spent too long writing this blog post 😢.

All changes

Breaking changes

  • Ecobee3 occupancy sensors have moved from sensor platform to binary sensor platform.
  • Forecast.io entity IDs are now like sensor.forecastio_temperature. Previously they were like sensor.weather_temperature. Apologies for this change, but we needed to make Forecast.io more generic now that we have many weather platforms.
  • The Loop Energy sensor configuration format changed slightly, please reformat based on the revised documentation.
  • The configuration for the SABnzbd sensor has slightly changed. The prefix type: is no longer required for monitored variables.
  • The IMAP sensor now uses username instead of user.
  • The NZBGet sensor has had so many changes I can’t list them all. Please refer to the documentation for more info.

Deprecations

  • Using the thermostat and hvac components has been deprecated. Please migrate to the new climate component. (just change the component name, the configurations are compatible)
  • Using the rollershutter and garage_door components have also been deprecated. Please migrate to the new cover component. (just change the component name, the configurations are compatible)

Finishing up

Thanks all for sticking with me to the end. I’ll be taking over a lot of Paulus’s (@balloob) work while he is gone, but as I said, don’t worry because he’ll be back well before 0.28.0 comes out. Hopefully you didn’t find this jovial blog post too jarring from our standard style, I just wrote a lot of this at 2am after being awake for almost 20 hours, so I’m a little loopy hahaha 😴.

Also, thanks as always to our developer contributors, documentation contributors, but most of all our users! This would’ve just been a script that Paulus (@balloob) used to control his lights at home if we didn’t have your enthusiasm.

Feel free to let me know what you thought of this blog post and release on Gitter or my Twitter, or even the Home Assistant Twitter. Did I mention we have a brand new Facebook page that you should absolutely Like? There’s a convenient Facebook Like and Twitter follow button right on the sidebar.

I almost forgot about your 🎁 for reading all the way to here: a 🍪! Hope you enjoy it in good health 😄.

Talk to you soon on Gitter and in your pull request comments!

– Robbie

(p.s. To those of you that scrolled directly to the bottom to get your present, just know that you didn’t earn it like the others did. 😄)

Hotfix 0.27.1 - August 30

  • Migrate APCUPSd to voluptuous (@fabaff)
  • Ecobee operation mode fix (@turbokongen)
  • update ha-ffmpeg version to 0.9 (@pvizeli)
  • Device tracker component & platform validation. No more home_range. (@kellerza)
  • Added option to use effect:random for Flux Led light bulbs (@tchellomello)
  • Use voluptuous for smtp (@pvizeli)
  • Upgrade sendgrid to 3.2.10 (@fabaff)
  • Upgrade TwitterAPI to 2.4.2 (@fabaff)
  • Fix bug in wemo discovery caused by voluptuous addition. (@pavoni)
  • Bug fix for asuswrt device_tracker. (@Danielhiversen)
  • Remove units for humidity in Wundeground sensor (@arsaboo)
  • Fix media_player descriptions and select_source (@MartinHjelmare)
  • Allow user to configure server id to perform speed test against (@Teagan42)
  • Bug fix for asuswrt device_tracker. (@Danielhiversen)
  • More Ecobee operation mode fixes (@turbokongen)
  • Map Modes to setpoint indexes (@turbokongen)
  • fix voluptuous and cover autodiscovery (@pvizeli)
  • Fixes wrong statevalue and problem with zwave setpoint (@turbokongen)

Hotfix 0.27.2 - September 3

home-assistant

home-assistant-polymer

]]>
<![CDATA[Github-style calendar heatmap of device data]]> 2016-08-19T06:00:00+00:00 https://home-assistant.io/blog/2016/08/19/github-style-calendar-heatmap-of-device-data Thanks to Anton Kireyeu we are able to present another awesome Jupyter notebook. I guess that you all know the graph which Github is using to visualize your commits per day over a time-line. It’s a so-called heatmap. If there are more commits, it’s getting hotter. The latest notebook is capable to do the same thing for your devices. To be more precise, for the hours your devices are home.

Heatmap

]]>
<![CDATA[We Have Apps Now]]> 2016-08-16T10:00:00+00:00 https://home-assistant.io/blog/2016/08/16/we-have-apps-now I have been working on a new subsystem to complement Home Assistant’s Automation and Scripting components. AppDaemon is a python daemon that consumes events from Home Assistant and feeds them to snippets of python code called “Apps”. An App is a Python class that is instantiated possibly multiple times from AppDaemon and registers callbacks for various system events. It is also able to inspect and set state and call services. The API provides a rich environment suited to home automation tasks that can also leverage all the power of Python.

Another Take on Automation

If you haven’t yet read Paulus’ excellent Blog entry on Perfect Home Automation I would encourage you to take a look. As a veteran of several Home Automation systems with varying degrees success, it was this article more than anything else that convinced me that Home Assistant had the right philosophy behind it and was on the right track. One of the most important points made is that being able to control your lights from your phone, 9 times out of 10 is harder than using a lightswitch - where Home Automation really comes into its own is when you start removing the need to use a phone or the switch - the “Automation” in Home Automation. A surprisingly large number of systems out there miss this essential point and have limited abilities to automate anything which is why a robust and open system such as Home Assistant is such an important part of the equation to bring this all together in the vast and chaotic ecosystem that is the “Internet of Things”.

So given the importance of Automation, what should Automation allow us to do? I am a pragmatist at heart so I judge individual systems by the ease of accomplishing a few basic but representative tasks:

  • Can the system respond to presence or absence of people?
  • Can I turn a light on at Sunset +/- a certain amount of time?
  • Can I arrive home in light or dark and have the lights figure out if they should be on or off?
  • As I build my system out, can I get the individual pieces to co-operate and use and re-use (potentially complex) logic to make sure everything works smoothly?
  • Is it open and expandable?
  • Does it run locally without any reliance on the cloud?

In my opinion, Home Assistant accomplishes the majority of these very well with a combination of Automations, Scripts and Templates, and it’s Restful API.

So why AppDaemon? AppDaemon is not meant to replace Home Assistant Automations and Scripts, rather complement them. For a lot of things, automations work well and can be very succinct. However, there is a class of more complex automations for which they become harder to use, and appdeamon then comes into its own. It brings quite a few things to the table:

  • New paradigm - some problems require a procedural and/or iterative approach, and AppDaemon Apps are a much more natural fit for this. Recent enhancements to Home Assistant scripts and templates have made huge strides, but for the most complex scenarios, Apps can do things that Automations can’t
  • Ease of use - AppDaemon’s API is full of helper functions that make programming as easy and natural as possible. The functions and their operation are as “Pythonic” as possible, experienced Python programmers should feel right at home.
  • Reuse - write a piece of code once and instantiate it as an app as many times as you need with different parameters e.g. a motion light program that you can use in 5 different places around your home. The code stays the same, you just dynamically add new instances of it in the config file
  • Dynamic - AppDaemon has been designed from the start to enable the user to make changes without requiring a restart of Home Assistant, thanks to it’s loose coupling. However, it is better than that - the user can make changes to code and AppDaemon will automatically reload the code, figure out which Apps were using it and restart them to use the new code without the need to restart AppDaemon itself. It is also possible to change parameters for an individual or multiple apps and have them picked up dynamically, and for a final trick, removing or adding apps is also picked up dynamically. Testing cycles become a lot more efficient as a result.
  • Complex logic - Python’s If/Else constructs are clearer and easier to code for arbitrarily complex nested logic
  • Durable variables and state - variables can be kept between events to keep track of things like the number of times a motion sensor has been activated, or how long it has been since a door opened
  • All the power of Python - use any of Python’s libraries, create your own modules, share variables, refactor and re-use code, create a single app to do everything, or multiple apps for individual tasks - nothing is off limits!

It is in fact a testament to Home Assistant’s open nature that a component like AppDaemon can be integrated so neatly and closely that it acts in all ways like an extension of the system, not a second class citizen. Part of the strength of Home Assistant’s underlying design is that it makes no assumptions whatever about what it is controlling or reacting to, or reporting state on. This is made achievable in part by the great flexibility of Python as a programming environment for Home Assistant, and carrying that forward has enabled me to use the same philosophy for AppDaemon - it took surprisingly little code to be able to respond to basic events and call services in a completely open ended manner - the bulk of the work after that was adding additonal functions to make things that were already possible easier.

How it Works

The best way to show what AppDaemon does is through a few simple examples.

Sunrise/Sunset Lighting

Lets start with a simple App to turn a light on every night at sunset and off every morning at sunrise. Every App when first started will have its initialize() function called which gives it a chance to register a callback for AppDaemons’s scheduler for a specific time. In this case we are using run_at_sunrise() and run_at_sunset() to register 2 separate callbacks. The argument 0 is the number of seconds offset from sunrise or sunset and can be negative or positive. For complex intervals it can be convenient to use Python’s datetime.timedelta class for calculations. When sunrise or sunset occurs, the appropriate callback function, sunrise_cb() or sunset_cb() is called which then makes a call to Home Assistant to turn the porch light on or off by activating a scene. The variables args["on_scene"] and args["off_scene"] are passed through from the configuration of this particular App, and the same code could be reused to activate completely different scenes in a different version of the App.

import appapi

class OutsideLights(appapi.AppDaemon):

  def initialize(self):
    self.run_at_sunrise(self.sunrise_cb, 0)
    self.run_at_sunset(self.sunset_cb, 0)

  def sunrise_cb(self, args, kwargs):
    self.turn_on(self.args["off_scene"])

  def sunset_cb(self, args, kwargs):
    self.turn_on(self.args["on_scene"])

This is also fairly easy to achieve with Home Assistant automations, but we are just getting started.

Motion Light

Our next example is to turn on a light when motion is detected and it is dark, and turn it off after a period of time. This time, the initialize() function registers a callback on a state change (of the motion sensor) rather than a specific time. We tell AppDaemon that we are only interested in state changes where the motion detector comes on by adding an additional parameter to the callback registration - new = "on". When the motion is detected, the callack function motion() is called, and we check whether or not the sun has set using a built-in convenience function: sun_down(). Next, we turn the light on with turn_on(), then set a timer using run_in() to turn the light off after 60 seconds, which is another call to the scheduler to execute in a set time from now, which results in AppDaemon calling light_off() 60 seconds later using the turn_off() call to actually turn the light off. This is still pretty simple in code terms:

import appapi

class MotionLights(appapi.AppDaemon):

  def initialize(self):
    self.listen_state(self.motion, "binary_sensor.drive", new = "on")
  
  def motion(self, entity, attribute, old, new, kwargs):
    if self.sun_down():
      self.turn_on("light.drive")
      self.run_in(self.light_off, 60)
  
  def light_off(self, kwargs):
    self.turn_off("light.drive")

This is starting to get a little more complex in Home Assistant automations requiring an Automation rule and two separate scripts.

Now lets extend this with a somewhat artificial example to show something that is simple in AppDaemon but very difficult if not impossible using automations. Lets warn someone inside the house that there has been motion outside by flashing a lamp on and off 10 times. We are reacting to the motion as before by turning on the light and setting a timer to turn it off again, but in addition, we set a 1 second timer to run flash_warning() which when called, toggles the inside light and sets another timer to call itself a second later. To avoid re-triggering forever, it keeps a count of how many times it has been activated and bales out after 10 iterations.

import appapi

class FlashyMotionLights(appapi.AppDaemon):

  def initialize(self):
    self.listen_state(self.motion, "binary_sensor.drive", new = "on")
  
  def motion(self, entity, attribute, old, new, kwargs):
    if self.self.sun_down():
      self.turn_on("light.drive")
      self.run_in(self.light_off, 60)
      self.flashcount = 0
      self.run_in(self.flash_warning, 1)
  
  def light_off(self, kwargs):
    self.turn_off("light.drive")
    
  def flash_warning(self, kwargs):
    self.toggle("light.living_room")
    self.flashcount += 1
    if self.flashcount < 10:
      self.run_in(self.flash_warning, 1)

Of course if I wanted to make this App or its predecessor reusable I would have provided parameters for the sensor, the light to activate on motion, the warning light and even the number of flashes and delay between flashes.

In addition, Apps can write to AppDaemon’s logfiles, and there is a system of constraints that allows yout to control when and under what circumstances Apps and callbacks are active to keep the logic clean and simple.

I have spent the last few weeks moving all of my (fairly complex) automations over to APPDaemon and so far it is working very reliably.

Some people will maybe look at all of this and say “what use is this, I can already do all of this”, and that is fine, as I said this is an alternative not a replacement, but I am hopeful that for some users this will seem a more natural, powerful and nimble way of building potentially very complex automations.

If this has whet your appetite, feel free to give it a try. You can find it, here, including full installation instructions, an API reference, and a number of fully fleshed out examples.

Happy Automating!

]]>
<![CDATA[0.26: Foursquare, Fast.com, FFMPEG and GPSD]]> 2016-08-13T19:00:00+00:00 https://home-assistant.io/blog/2016/08/13/foursquare-fast-com-ffmpeg-gpsd It’s time for 0.26 and it’s again full of new features and fixes. First I want to highlight that we are now having 500 000 monthly pageviews on the website. A big milestone for us! It’s been an amazing journey. Big thanks to the Home Assistant community for being such a delightful bunch.

This release includes code contributed by 31 different people. The biggest change in this release is a new unit system. Instead of picking Celsius or Fahrenheit you’ll have to pick imperial or metric now. This influences the units for your temperature, distance, and weight. This will simplify any platform or component that needs to know this information. Big thanks to @Teagan42 for her hard work on this!

Hotfix 0.26.1 - August 14

  • Fix serial_pm config validation (@open-homeautomation)
  • Check for existence of system mode on Honeywell thermostats (@mKeRix)
  • Fix unknown unit of measurement for hvac and thermostat component (@turbokongen)

Hotfix 0.26.2 - August 15

  • Fix Wemo: have PyWemo play nicely with the latest Requests (@pavoni)

Hotfix 0.26.3 - August 19

  • Media Player cover art would not work when an API password was set. Thanks to @maddox for reporting it and @balloob for the fix.

Breaking changes

  • A new unit system has superseded the temperature unit option in the core configuration. For now it is backwards compatible, but you should update soon:
# Configuration.yaml example
homeassistant:
  # 'metric' for the metric system, 'imperial' for the imperial system
  unit_system: metric
]]>
<![CDATA[Optimizing the Home Assistant mobile web app]]> 2016-08-07T19:36:00+00:00 https://home-assistant.io/blog/2016/08/07/optimizing-the-home-assistant-mobile-web-app This blog post will go into detail about the recent performance optimizations that went into the Home Assistant front end. For people not familiar with the app, check out the demo and the source.

TL; DR: Don’t hack the framework, separate responsibilities, ship less, use service workers, use (future) web standards.

This year at Google I/O I saw Monica from the Polymer team talk about web components and performance. In her talk she mentions a mantra that they use in the Polymer team to make things fast: Do less and be lazy.

Do less and be lazy. It sounds so obvious and it took a while before it started to dawn on me. I think most of the code I write is pretty fast, but I don’t often stop to take a harder look at how and when it runs in practice. When do we need the result, can it be postponed?

And thus started my journey to take a critical look at how the Home Assistant app was working and how to make things faster. Below is the list of the different things that I did to make it fast.

I hope this list can be useful to other people, as a guide for optimizing their own apps or for avoiding pitfalls when building a new one.

The first thing to do is to measure. The Home Assistant front end is a mobile web app, so we shouldn’t measure this on a machine with 8 cores and gigabytes of ram but instead measure on devices you expect a mobile web app to run: phones. Below are two timelines recorded with Home Assistant 0.18.2 (pre-optimizations) and Google Chrome 53. On my Mac the app starts in 1400 miliseconds and on my Nexus 5x in ~6500 miliseconds (~4.5 times slower!).

Timeline of loading the front end in Home Assistant 0.18.2

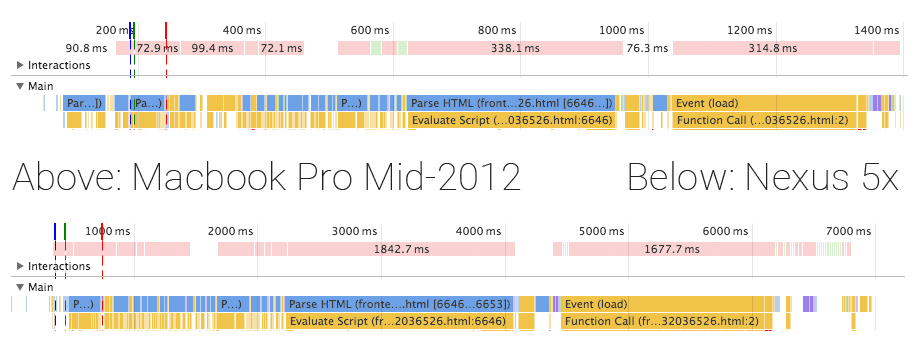
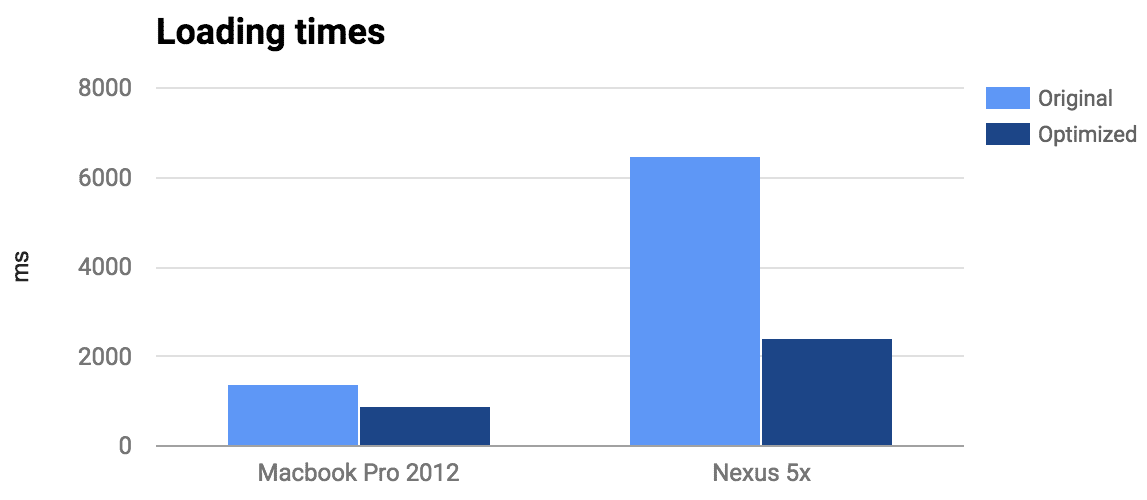
Although the app takes 6500 milliseconds to load on my phone, it would perform well afterwards. Still, that initial load is unacceptable. You expect to open an app on your phone and be able to use it, quickly. After I applied all the changes described below, I managed to reduce startup time to 900 miliseconds (-35%) on my Mac and 2400 miliseconds (-63%) on my Nexus 5x. Check out the demo here.

diagram showing old and new loading times next to one another Timeline of loading the front end in Home Assistant 0.26

Technology

The Home Assistant front end consists of two parts. There is Home Assistant JS, which controls all data and interaction between JavaScript and the server. It is a Flux architecture using NuclearJS and ImmutableJS. The UI is implemented by Home Assistant Polymer using Polymer and web components.

Don’t hack the framework

I thought to be smart. I split out the JavaScript part of all web components and bundled them separately using Webpack so that I could use ES2015 via BabelJS (architecture). This is not how Polymer components are written and it meant that I was unable to use any of the tooling that is available in the community or easily split up the bundle (more on this later).

So I went ahead and backported all my web components back from shiny beautiful ES6 to ES5. And you know what? It’s not that bad. Yes, not being able to use the concise object notation and arrow functions make your code more verbose. But in the end it is the same code that is running in browsers.

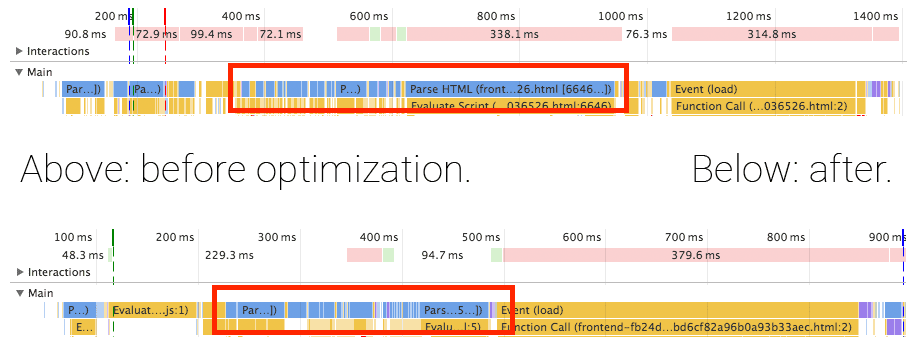
Another benefit of having each web component contain their own script tag is that the browser will process them one by one, allowing the browser to render our loading spinner animation in between.

As you can see in the timelines, we were able to get rid of most of the blocking component loading.

Timeline of loading the front end before and after the optimization

Separate responsibilities

Whenever you learn a new technology, you feel like you’ve learned a new superpower. Wow, I can do all this with only 2 lines?! I had the same with bundling.

I was initially very focused on shipping just a single file with everything that my app needed. The entry point would be my main component which would require all of its Flux and UI dependencies. Then, just before it all would be rendered, it would check if there is authentication and start the data fetching.

This is a very bad pattern. This means that you will not start any data fetching until your UI is ready to render. Instead, you want your data to be fetched as soon as possible, and while the request is out to the server you want the page to load all your UI components.

To accomplish this I extracted the application core out of the main bundle. In the current optimized version it’s 31.1kb gzip’d. It is loaded before any other scripts so that it can start fetching data as soon as possible.

Timeline of loading the front end before and after the optimization

When the data does come back before the UI is done loading, we can process it before we start rendering the UI because of all the web components being processed individually. This means that we don’t have to show a loading screen the first time our components render – we can just render the components with the data they require.

Ship less

The theory behind this one is simple: if we manage to ship less code, the browser has to process less code and it will start faster.

Only include the components for the page that you will show

The Home Assistant mobile web application has 10 different panels (pages). Besides that, it also has a dialog for each type of device to show more info. That’s a lot of components and screens of which only a very small set is needed at the start. That means that we are shipping a lot of unnecessary data that the browser has to process before our initial render!

I broke up each panel of the app into a separate bundle that will be loaded on demand. This saved 250 kilobytes (pre-gzip) on just the embedded map alone! This change, however, required some significant changes to our build process.

Breaking up an app in JavaScript is complex because each module explicitly imports their dependencies. This has to continue to work in your browser after breaking it up in multiple files. Web components do not have this problem as it’s part of the platform and thus your browser is the registry! An unregistered web component will be rendered as an empty span element until the element gets registered. Loading order is not important.

// Example of the flexibility of web components.
var spinner = document.createElement('paper-spinner');
spinner.active = true;
document.body.appendChild(spinner);

Because the browser tracks your web components, creating standalone bundles for parts of the app is easy:

  • Find all dependencies included in the main bundle (using hydrolysis)
  • Create individual bundles of each panel (page) but filter out the dependencies included in main bundle.

The build script that bundles and minifies the main bundle and panel bundles is <100 lines.

Change the JavaScript bundler to Rollup

Core.js is still pure JavaScript and requires bundling. In my journey to get a smaller bundle, I went from Webpack to Webpack 2 to Rollup. At each step the bundle got smaller. Rollup is the big winner here because it doesn’t wrap all your modules in function calls but instead concatenates all files with minimal changes to make it work. This not only reduces the file size but also the loading speed. This is because the JavaScript engine will no longer have to invoke a function to resolve each import, it’s doing less work. This might not mean much for a computer but on a phone, everything counts.

Scrutinize dependencies

If the goal is to ship less, it’s time to take a good look at dependencies. It’s so often that we decide to fall back to yet another NPM package that makes our life a little easier but comes at the cost of size – size usually taken up by functionality that you might never need.

Remove Lodash

I realized that I only used a few methods of lodash. Lodash (and previously underscore) used to be one of the dependencies that would always be one of the first things that I would add to any project I start. But I could no longer justify it in the case of Home Assistant. Even with dead tree shaking it was not worth including it. Yes, they support a lot of edge cases but those were not relevant to my use case. And standalone lodash packages are still huge. The only thing that I couldn’t replace with a few lines of my own code was debounce. However I found a 40 line replacement.

Replace moment.js with Fecha

Moment.js is one of those power libraries. It is able to handle any date problem that you can throw at it. But this obviously comes at the cost of size. Fecha is a date formatting library at ~8% the size of moment.js (only 4.7kb pre-gzip). The only thing that it does not contain is date manipulation, which was something that was not being used.

Use Service worker to instantly load the app

Using a service worker we’re able to store all app components and core javascript in the browser. This means that after their first visit, the browser will only have to go to the network to fetch the latest data from the server.

Creating a service worker is easy using sw-precache, a service worker generation tool.

When a browser does not support service workers, Home Assistant will serve fingerprinted assets that are aggressively cached. Only when the content changes will the client redownload the asset.

Using fingerprinting with sw-precache required jumping through a few hoops. The final build script can be found here.

Make it feel fast

This one is more psychological: no one likes staring at a white screen because white screens are ambiguous: are we loading something, is there a crappy connection or maybe even a script error? That’s why it is very important to render something on the screen to show that the rest is being loaded, and as quickly as possible.

The Home Assistant landing page contains just enough CSS and HTML to render the loading screen minus the animations.

Now that the app is fast enough, I might swap out moving from a lite loading screen to drawing an empty toolbar. This makes it look like the UI is almost there.

Using a framework build on web standards

I left this to the end of the list, mainly because I had no influence on this. Polymer just happened to ship an update while I was optimizing the application which gave a big boost to the loading time.

By using Polymer we have the ability to use tomorrow’s web standards today. This is powered by polyfills. A polyfill will use JavaScript to simulate the behavior that the web standard would have taken care of. As browsers progress, more work can move from the polyfills back to the browsers. This is great because browsers will be able to optimize the work better and thus be faster.

Polymer 1.6 was introduced at the end of June and allowed the app to take advantage of native CSS variables in Chrome and Firefox. It also introduced lazy registration. Both greatly sped up our loading times.

Future optimizations

A lot of optimizations have been applied but this journey will never be over. There are still a lot of opportunities to make things even faster. Some ideas that are on my list to explore:

  • Use shadow DOM instead of shady DOM polyfill.
  • Use closure compiler to optimize the JavaScript.
  • Reduce the number of icons that are loaded.
  • Embed initial API response in served page if not using a service worker.
  • Reduce size of initial bundle by moving out all things that are not visible for initial paint. For example the dialogs that show more info about entities.
  • Prefetch the other pages using <link rel="preload" …>
]]>
<![CDATA[Laundry Sensors with NodeMCU and Home Assistant]]> 2016-08-03T17:22:00+00:00 https://home-assistant.io/blog/2016/08/03/laundry-automation-update This is a guest post by Home Assistant user and contributor Nolan Gilley.

Today I’ll show you how I used Home Assistant, a NodeMCU (ESP8266), and a couple of accelerometers to automate our laundry room. This is a rewrite of an old post where I did the same thing using a Moteino & Raspberry Pi. This version only requires a NodeMCU.

We have an older washer and dryer which doesn’t have any form of notification when cycles complete. Home Assistant was the obvious solution, I just needed to create sensors for the washer and dryer. I tried using sound sensors but found them unreliable. I ended up using an accelerometer attached to the back of each appliance. I also added magnetic reed switches on the doors of the washer and dryer to detect whether they’re open or closed. I connected the accelerometers and reed switches to an NodeMCU which will relay the data to my MQTT broker.

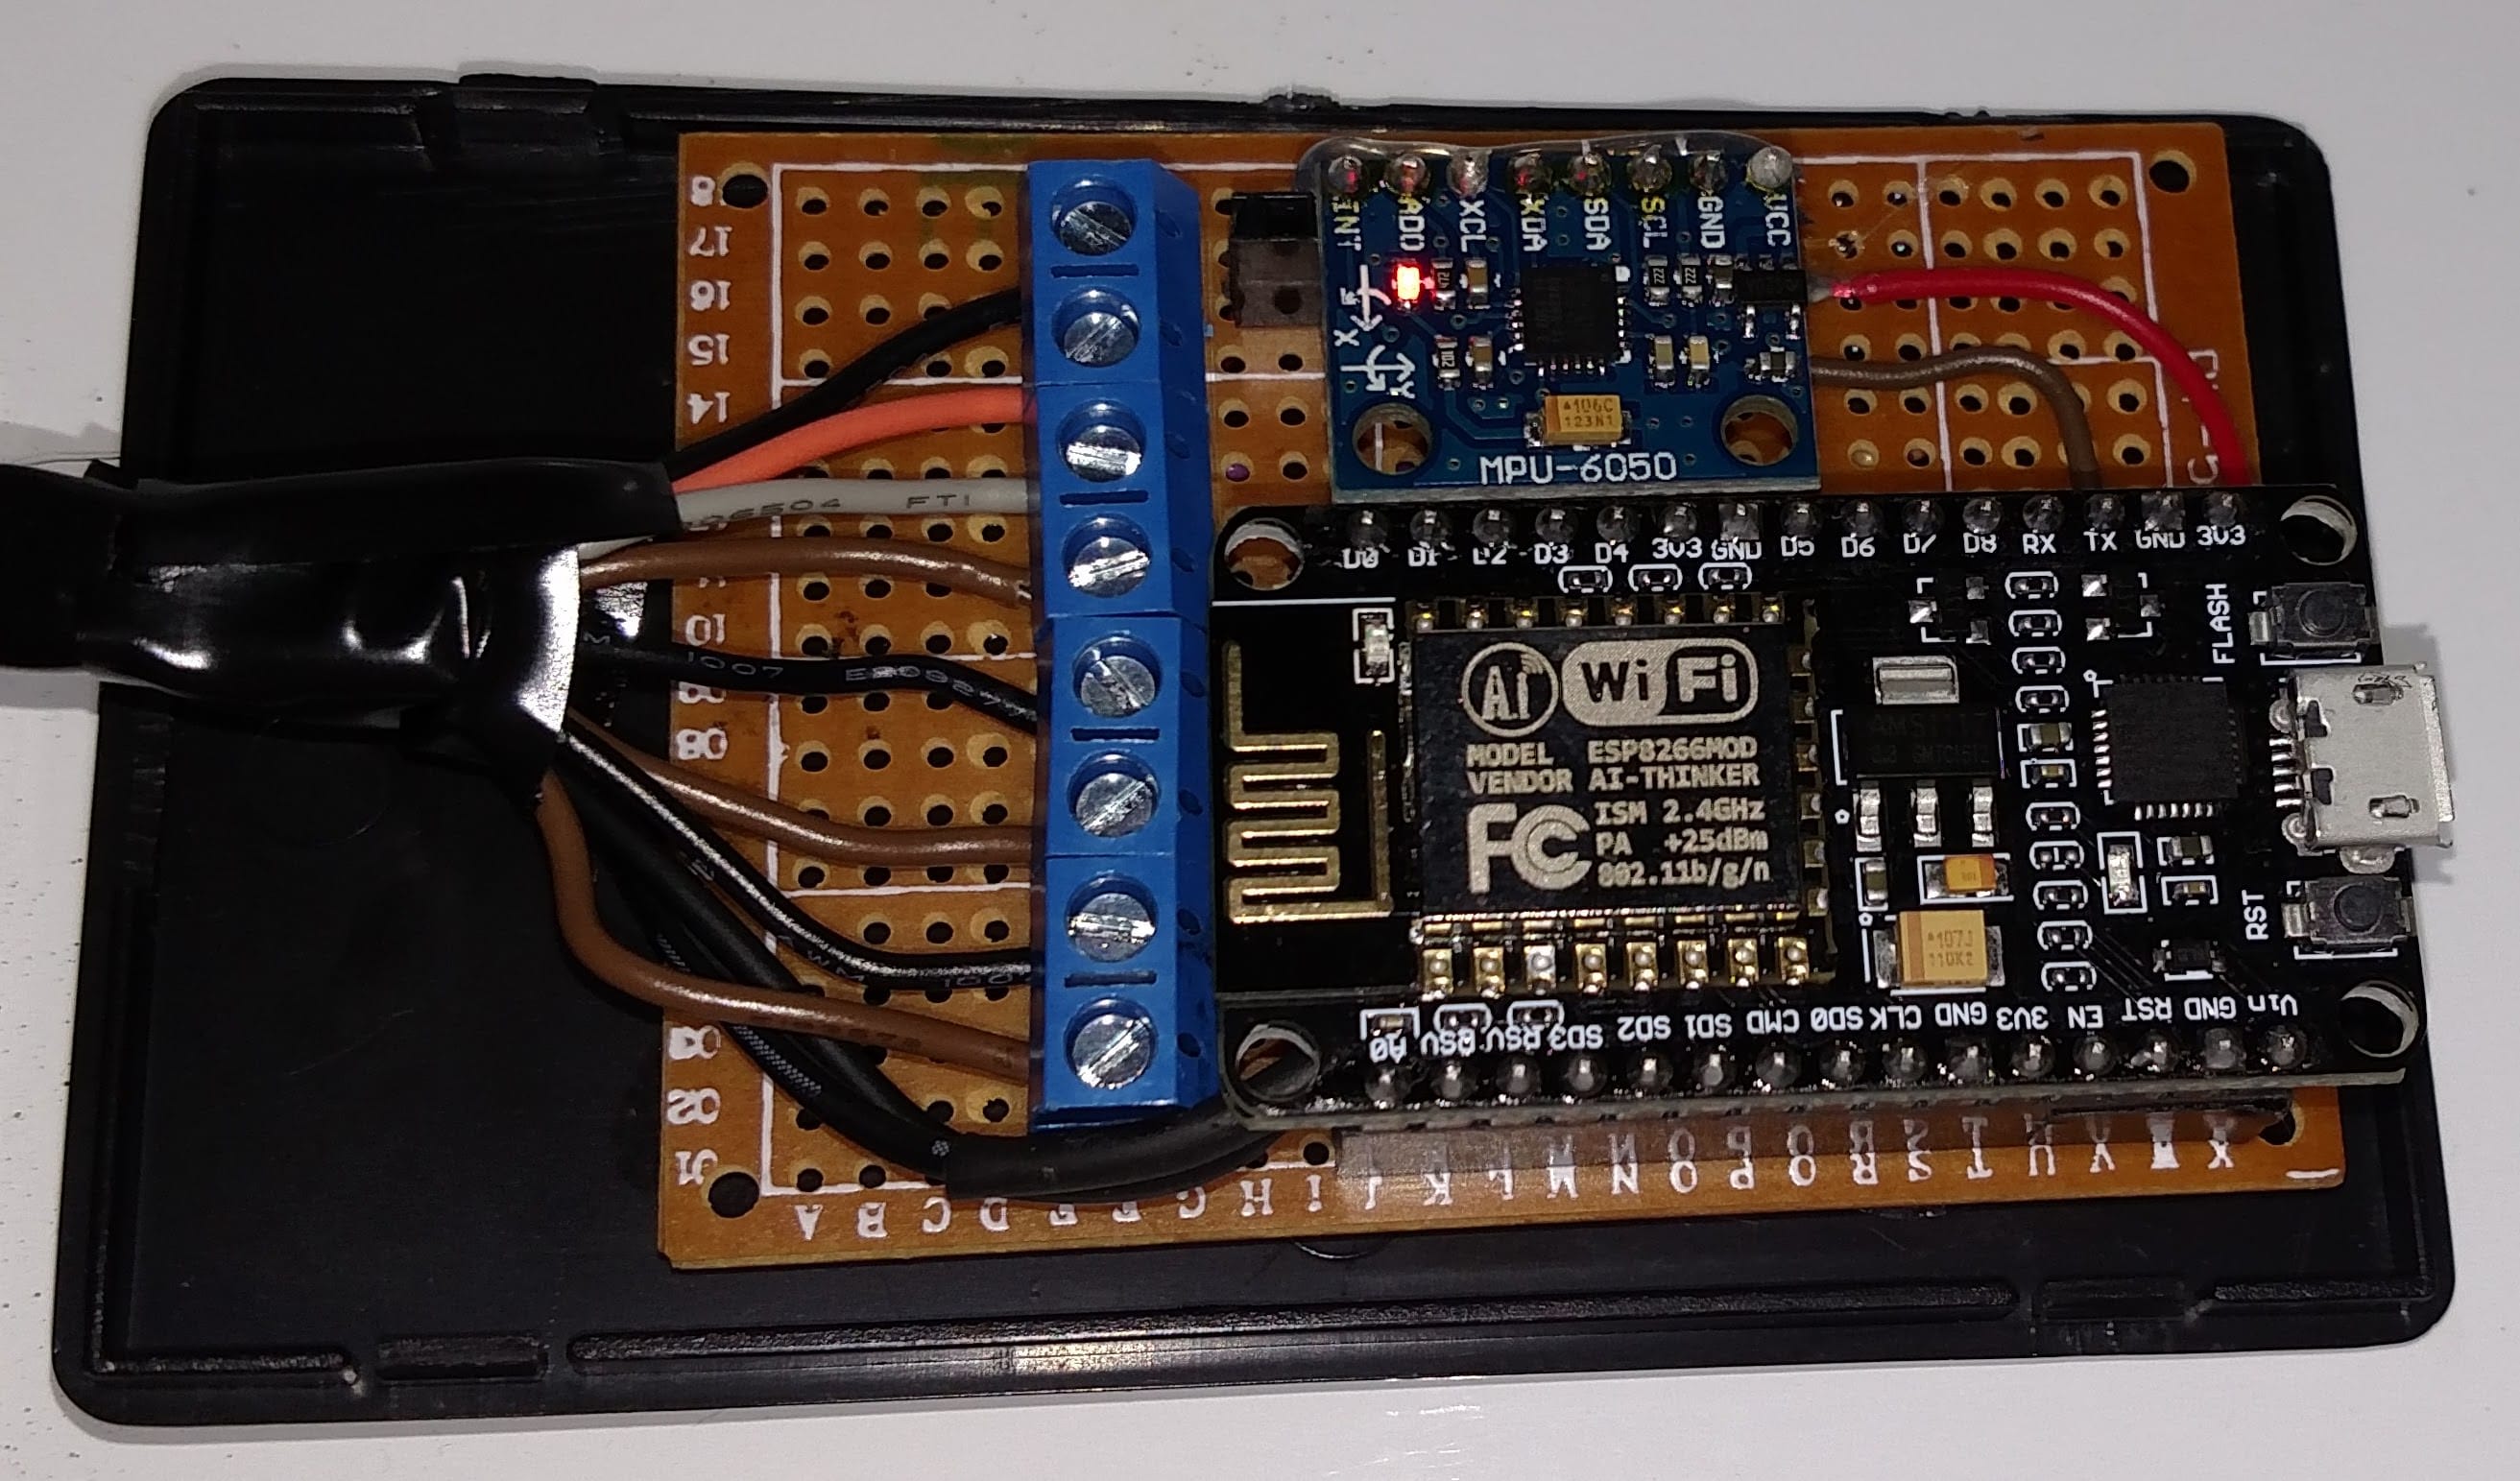
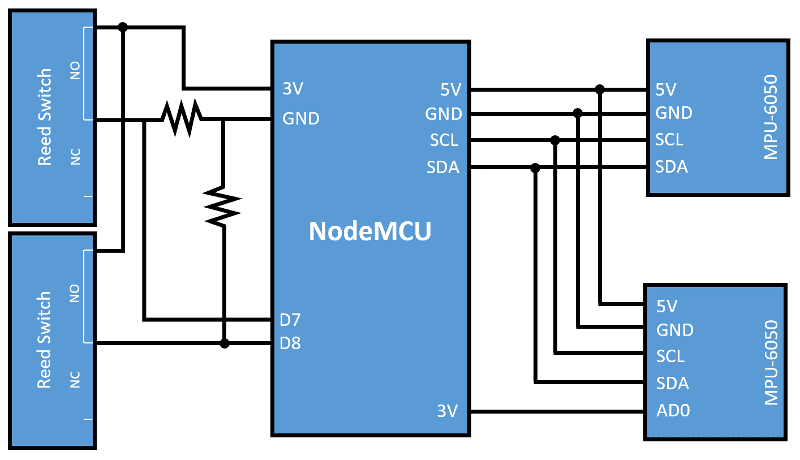
Block diagram of schematic

After taking some sample data from the accelerometers while each appliance was in operation, I decided to plot the data to help determine the proper thresholds of when the devices were running or off. I had to do this in order to get precise ranges so the dryer sensor wouldn’t get tripped by the washer or vice versa. In the plot below you can see the acceleration in each direction for the accelerometer connected to the dryer. It’s easy to see when the dryer is in operation here. I used the same technique for the washer’s accelerometer.

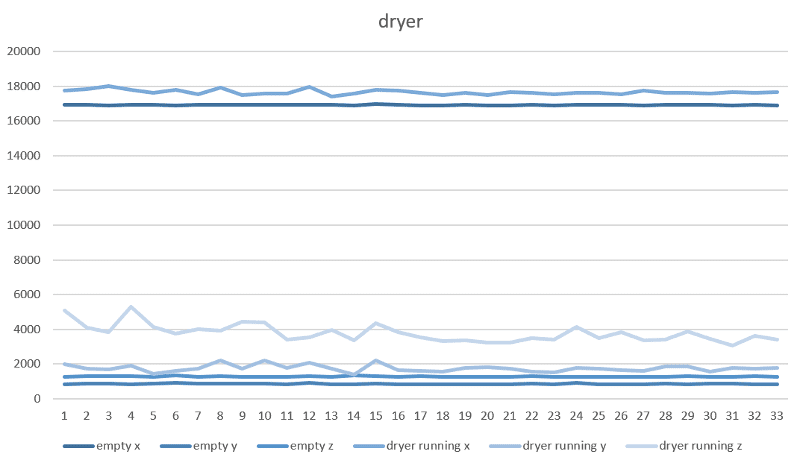
Graph showing the accelerometer data

Next it was just a matter of integrating everything with Home Assistant. I was able to use the MQTT component to read the washer and dryer states from the Moteino and display it in Home Assistant.

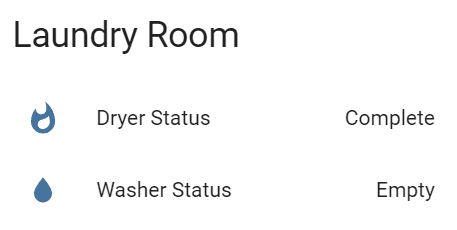
Status of the dryer and washer in Home Assistant

Next I wrote scripts that are run whenever the washer or dryer completes a load. This is triggered by the automation component. When the laundry is complete I have the lights in the house turn red and notify me via Join. Once the door is opened and laundry emptied another script runs that sets the lights back to normal. So far it has been very helpful and very reliable.

NodeMCU connected to MPU-6050 accelerometer.

Materials used:

Sketch for the NodeMCU is available here.

Home Assistant Configuration:

mqtt:
  broker: 192.168.1.100
  port: 1883
  keepalive: 60
  qos: 0

sensor:
  - platform: mqtt
    name: "Dryer Status"
    state_topic: "sensor/dryer"
    unit_of_measurement: ""

  - platform: mqtt
    name: "Washer Status"
    state_topic: "sensor/washer"
    unit_of_measurement: ""

automation:
  - alias: Washer complete
    trigger:
      platform: state
      entity_id: sensor.washer_status
      from: 'Running'
      to: 'Complete'
    action:
      service: script.turn_on
      entity_id: script.washer_complete

  - alias: Washer emptied
    trigger:
      platform: state
      entity_id: sensor.washer_status
      from: 'Complete'
      to: 'Empty'
    action:
      service: scene.turn_on
      entity_id: scene.normal

script:
  washer_complete:
    alias: Washer Complete
    sequence:
      - alias: Join Notification
        service: notify.join
        data:
          message: "The washing machine has finished its cycle, please empty it!"
      - alias: Living Room Lights Blue
        service: scene.turn_on
        data:
          entity_id: scene.blue

Resources used:

]]>
<![CDATA[0.25: Custom frontend panels, Jupyter notebooks, DirecTV.]]> 2016-07-30T12:00:00+00:00 https://home-assistant.io/blog/2016/07/30/custom-frontend-panels--jupyter-notebooks--directv When Home Assistant started the focus has always been on making a great developer experience. Allowing anyone to add support for their favorite devices to Home Assistant easily. This focus has been a great success since we now have 339 components and platforms!

Starting with this release, we are extending our extensability to the frontend. Starting this release, any component can add it’s own page to the frontend. Examples of this today are the map, logbook and history. We are looking forward to all the crazy panels you’ll come up with!

We have also seen an exciting trend of people starting to visualize their Internet of Things data using Jupyter Notebooks, which are a great way to create and share documents that contain code, visualizations, and explanatory text. In case you missed it, the blog post by @kireyeu shows an advanced usecase while our Notebooks in the Home Assistant Notebooks repository cover the basics.

This release also includes a bunch of new integrations, among others three new media player platforms. This means that today Home Assistant can talk to 26 different media players!

The brand-new iFrame panel component allows you to add other websites as pages in the Home Assistant frontend. They will show up in the sidebar and can be used the same way as you open the frontend in your browser but all within one view.

I would like to do a shoutout to @fabianhjr. He has started adding typing data (PEP484) to the Home Assistant core. This will help us identify issues before they are released.

Hotfix 0.25.1 - August 1

  • Light - Z-Wave: Bring back delayed value update behavior (@jnewland)
  • Recorder: Properly close session after execute (@kellerza)
  • Media Player - Kodi: No longer block startup if connecting to wrong port (@shoekstra)
  • Downgrade voluptuous to 0.8.9 as it blocked the upgrade for some (@balloob)

Hotfix 0.25.2 - August 2

  • Hotfix to make sure Z-Wave locks work again. Thanks to @tobiebooth for the quick fix.

Breaking changes

  • Google Voice SMS notification support was removed.
]]>
<![CDATA[ESP8266 and MicroPython - Part 1]]> 2016-07-28T04:00:00+00:00 https://home-assistant.io/blog/2016/07/28/esp8266-and-micropython-part1 The first release of Micropython for ESP8266 was delivered a couple of weeks ago. The documentation covers a lot of ground. This post is providing only a little summary which should get you started.

Until a couple of weeks ago, the pre-built MicroPython binary for the ESP8266 was only available to backers of the Kickstarter campaign. This has changed now and it is available to the public for download.

The easiest way is to use esptool.py for firmware handling tasks. First erase the flash:

$ sudo python esptool.py --port /dev/ttyUSB0 erase_flash
esptool.py v1.0.2-dev
Connecting...
Erasing flash (this may take a while)...

and then load the firmware. You may adjust the file name of the firmware binary.

$ sudo python esptool.py --port /dev/ttyUSB0 --baud 460800 write_flash --flash_size=8m 0 esp8266-2016-07-10-v1.8.2.bin
esptool.py v1.2-dev
Connecting...
Running Cesanta flasher stub...
Flash params set to 0x0020
Writing 540672 @ 0x0... 540672 (100 %)
Wrote 540672 bytes at 0x0 in 13.1 seconds (330.8 kbit/s)...
Leaving...

Now reset the device. You should then be able to use the REPL (Read Evaluate Print Loop). On Linux there is minicom or picocom, on a Mac you can use screen (eg. screen /dev/tty.SLAB_USBtoUART 115200), and on Windows there is Putty to open a serial connection and get the REPL prompt.

The WebREPL work over a wireless connection and allows easy access to a prompt in your browser. An instance of the WebREPL client is hosted at http://micropython.org/webrepl. Alternatively, you can create a local clone of their GitHub repository. This is neccessary if your want to use the command-line tool webrepl_cli.py which is mentionend later in this post.

$ sudo minicom -D /dev/ttyUSB0
#4 ets_task(4020e374, 29, 3fff70e8, 10)                                                          
WebREPL daemon started on ws://192.168.4.1:8266
Started webrepl in setup mode
could not open file 'main.py' for reading

#5 ets_task(4010035c, 3, 3fff6360, 4)
MicroPython v1.8.2-9-g805c2b9 on 2016-07-10; ESP module with ESP8266
Type "help()" for more information.
>>> 

The public build of the firmware may be different than the firmware distributed to the backers of the Kickstarter campaign. Especially in regard of the available modules, turned on debug messages, and alike. Also, the WebREPL may not be started by default.

Connect a LED to pin 5 (or another pin of your choosing) to check if the ESP8266 is working as expected.

>>> import machine
>>> pin = machine.Pin(5, machine.Pin.OUT)
>>> pin.high()

You can toogle the LED by changing its state with pin.high() and pin.low().

Various ESP8266 development board are shipped with an onboard photocell or a light dependent resistors (LDR) connected to the analog pin of your ESP8266 check if you are able to obtain a value.

>>> import machine
>>> brightness = machine.ADC(0)
>>> brightness.read()

Make sure that you are familiar with REPL and WebREPL because this will be needed soon. Keep in mind the password for the WebREPL access.

Read the instructions about how to setup your wireless connection. Basically you need to upload a boot.py file to the microcontroller and this file is taking care of the connection setup. Below you find a sample which is more or less the same as shown in the documentation.

def do_connect():
    import network

    SSID = 'SSID'
    PASSWORD = 'PASSWORD'

    sta_if = network.WLAN(network.STA_IF)
    ap_if = network.WLAN(network.AP_IF)
    if ap_if.active():
        ap_if.active(False)
    if not sta_if.isconnected():
        print('connecting to network...')
        sta_if.active(True)
        sta_if.connect(SSID, PASSWORD)
        while not sta_if.isconnected():
            pass
    print('Network configuration:', sta_if.ifconfig())

Upload this file with webrepl_cli.py or the WebREPL:

$ python webrepl_cli.py boot.py 192.168.4.1:/boot.py

If you reboot, you should see your current IP address in the terminal.

>>> Network configuration: ('192.168.0.10', '255.255.255.0', '192.168.0.1', '192.168.0.1')

First let’s create a little consumer for Home Assistant sensor’s state. The code to place in main.py is a mixture of code from above and the RESTful API of Home Assistant. If the temperature in the kitchen is higher than 20 °C then the LED connected to pin 5 is switched on.

If a module is missing then you need to download it from the MicroPython Library overview and upload it to the ESP8266 with webrepl_cli.py manually.

# Sample code to request the state of a Home Assistant entity.

API_PASSWORD = 'YOUR_PASSWORD'
URL = 'http://192.168.0.5:8123/api/states/'
ENTITY = 'sensor.kitchen_temperature'
TIMEOUT = 30
PIN = 5

def get_data():
    import urequests
    url = '{}{}'.format(URL, ENTITY)
    headers = {'x-ha-access': API_PASSWORD,
               'content-type': 'application/json'}
    resp = urequests.get(URL, headers=headers)
    return resp.json()['state']

def main():
    import machine
    import time

    pin = machine.Pin(PIN, machine.Pin.OUT)
    while True:
        try:
            if int(get_data()) >= 20:
                pin.high()
            else:
                pin.low()
        except TypeError:
            pass
        time.sleep(TIMEOUT)

if __name__ == '__main__':
    print('Get the state of {}'.format(ENTITY))
    main()

Upload main.py the same way as boot.py. After a reboot (>>> import machine and >>> machine.reboot()) or power-cycling your physical notifier is ready.

If you run into trouble, press “Ctrl+c” in the REPL to stop the execution of the code, enter >>> import webrepl and >>> webrepl.start(), and upload your fixed file.

]]>
<![CDATA[IoT Data Exploration with Jupyter Notebooks]]> 2016-07-23T18:00:00+00:00 https://home-assistant.io/blog/2016/07/23/internet-of-things-data-exploration-with-jupyter-notebooks This is the first blog post by Anton Kireyeu. A new contributor to Home Assistant who will focus on exploring and visualizing Home Assistant data.

As we learned in the recent blog post by Fabian, all operational data of your Home Assistant application is stored locally and is available for exploration. Our first steps were querying data with the DB Browser for SQLite, exporting the data extract as a CSV file and graphing in LibreOffice. But what else can be done with this data and what tools are there available?

This post will help you get set up using a few popular data scientist tools to allow you to locally process your data:

  •  Pandas: an open source tool for data analysis for Python
  •  matplotlib: a Python plotting library
  •  Jupyter notebook: application for creation and sharing of documents containing live code, visualizations and explanatory text

One of the graphs created with this tutorial.

TL; DR: Use this Jupyter Notebook to visualize of your data

Dependencies

In order to run the provided Jupyter notebook, please make sure you have the following applications/libraries installed on your computer:

  • Pandas
  • NumPy
  • Matplotlib
  • SQLAlchemy
  • Jupyter

As a Windows user myself, I find the easiest, quickest and most hassle-free way of installing all of these dependencies is to use WinPython. This free open-source portable distribution includes all of the dependencies required for this notebook, as well as a few other essential Python libraries you may require for data exploration in the future.

Why Jupyter?

While all Home Assistant implementations can have varying setup, components and scripts, the underlying data structure is standardized and well-defined. This allows us to write Python code that is environmentally agnostic. Wrapping it in a Jupyter notebook ensures the code, visualizations and directions/explanations are kept digestible and neatly-packaged. One of the amazing features of Jupyter is the ability to change code as you go along, customizing all outputs and visualizations on the fly!

Where do I start?

This tutorial is based around a heavily commented Jupyter Notebook that we created. So to get started, you will have to open that:

  • download the tutorial Jupyter Notebook (leads to preview page, from there click download top-right)
  • launch the Jupyter Notebook App
  • Click the ‘upload’ button to add the downloaded notebook to Jupyter
  • Adjust the DB_URL at the beginning of the notebook to point at your Home Assistant database
  • Select in top menu: Cell -> Run All

That’s it! The included code will walk you through importing the required libraries, show running raw SQL against your local database, plotting basic data from the states table, and in the end output a few plots of changes for every entity in your system as well as the mean daily value for the past 20 days.

After just those few steps, you will be greeted with beautiful formatted data like this:

One of the graphs created with this tutorial.

What’s next?

Thanks to the magic of Jupyter, all of the code is customizable: want to selectively display your data, only covering a specific entity? Sure thing! Want to change the properties of the plots? No problem!

While you learn and explore your IoT data, we will be working on providing more ready-to-use Jupyter Notebooks. Feel free to ask questions or provide suggestions. Would you like to see a specific visualization? Is there a particular facet of data you’re interested in? Let’s talk about it, let’s dive into the world of data together!

]]>