This is a guest post by Home Assistant users Jeremiah Wuenschel and St. John Johnson.
So you own a SmartThings Hub. You probably bought it when you were looking to get into the whole Home Automation hobby because it worked with pretty much everything and offered you the ability to automate anything. After a week of ownership, you realized that building dashboards and automating required writing way more Groovy then you expected. Then one day you were browsing reddit and discovered the amazingness that is Home Assistant! A solution that offered dashboards, graphs, working support for Nest, and REAL EASY automation!
You spent your weekend getting everything set up, showing it off to your significant other, but in the end you got stumped when it came to integrating with all your existing SmartThings toys. What do I do now? Should I buy another hub? Should I just buy a Z-Wave stick?
That’s where we came in. We wanted a solution that can bridge the awesomeness of Home Assistant with the SmartThings hub that works with almost everything.
Glossary
This is going to be a pretty detailed tutorial on setting up our SmartThings bridge. However, there are a couple key terms that might be new to you:
- MQTT: A lightweight message protocol for listening and publishing events that happen. Many home automation platforms have built in support for this (especially Home Assistant).
- Docker: A tool for running applications that are self-contained. No need for installing any dependencies or worrying about conflicts. Installs easily on Linux and OSX.
Setting up the Bridge
MQTT
Assuming that you already have Home Assistant and Smart Things running, you will first want to get an MQTT broker running. There are a handful of MQTT brokers available in Open Source land. We chose Mosca for its simplicity.
There is very little you need to do to get Mosca running. The easiest approach is to use Docker, and run a command like the following:
$ docker run \
    -d \
    --name="mqtt" \
    -v /opt/mosca:/db \
    -p 1883:1883 \
    matteocollina/mosca
This will start Mosca up inside of a docker container, while keeping persistent storage for Mosca in /opt/mosca. The default configuration is the only thing we need to get things up and running.
If you don’t want to mess with Docker and can get node.js installed without trouble, the standalone instructions are all you need.
MQTT Bridge
This is the small piece of magic that bridges the gap between MQTT and SmartThings. It is a node.js app, and like Mosca it is probably easiest to install with Docker:
$ docker run \
    -d \
    --name="mqtt-bridge" \
    -v /opt/mqtt-bridge:/config \
    -p 8080:8080 \
    stjohnjohnson/smartthings-mqtt-bridge
The code for this bridge is on Github if you want to start it up independently.
The MQTT Bridge only needs to know where your MQTT broker lives. If you are using these docker commands as-is, edit /opt/mqtt-bridge/config.yml to look like this:
---
mqtt:
    host: <IP of the host>
Restart the bridge, and you are ready to go:
$ docker restart mqtt-bridge
SmartThings Device
The next step (and possibly the most confusing) is the device type. Go to the Smart Things Device IDE and Create New Device Handler. Choose From Code and paste in the MQTT Bridge Device Code. Click Save, Publish, and then For Me.
Now to install your new Device Handler. Go back to My Devices in the IDE, and click New Device. Enter a name, and pick any random set of characters for the Device Network Id (this will automatically update later). For Type, scroll to the bottom of the list and find your newly created MQTT Bridge. Fill in the other boxes however you like.
Go back to My Devices, and click on your new device in the list. This will bring up a page that allows you to edit your device’s Preferences. Click edit and fill in the 3 pieces of information it asks for.
- MQTT Bridge IP Address: <IP address of the MQTT Bridge from the previous step>
- MQTT Bridge Port: <8080 if you have changed nothing in the previous commands>
- MQTT Bridge MAC Address: <Mac address of machine running the Bridge code>
This will create the link between SmartThings and the MQTT Bridge.
SmartThings App
The last step is to setup the SmartApp. After this, any registered devices will start sending their events to MQTT.
Go to the Smart App IDE. Click New SmartApp, followed by From Code. Paste in the MQTT Bridge SmartApp code and click Save. Click Publish and then For Me. In the SmartThings mobile app, add the new SmartApp and configure it with your devices and MQTT Bridge device. Clicking done will subscribe SmartThings to your MQTT broker and begin 2-way propagation of events.
Configure Home Assistant
To add SmartThings devices to Home Assistant over MQTT, first enable MQTT in Home Assistant:
Replace localhost with the location of the running MQTT Broker. Devices from the MQTT Bridge are published to the path smartthings/<Device Name>/<Atribute>
For example, my Dimmer Z-Wave Lamp is called “Fireplace Lights” in SmartThings. The following topics are published:
| Topic |
Description |
| smartthings/Fireplace Lights/level |
Brightness (0-99) |
| smartthings/Fireplace Lights/switch |
Switch State (on/off) |
Here is an example Home Assistant config:
switch:
  platform: mqtt
  name: "Fireplace Lights"
  state_topic: "smartthings/Fireplace Lights/switch"
  command_topic: "smartthings/Fireplace Lights/switch"
  brightness_state_topic: "smartthings/Fireplace Lights/level"
  brightness_command_topic: "smartthings/Fireplace Lights/level"
  payload_on: "on"
  payload_off: "off"
  retain: true
We recommend retain: true for every MQTT device in order to keep states in sync when things become disconnected.
Start digging through the MQTT Components in Home Assistant to find which components map to the new events being published to MQTT.
Configuring with Docker-Compose
Our personal preference for starting the whole suite of software is to use a single Docker-Compose file. Just create a file called docker-compose.yml like this:
mqtt:
    image: matteocollina/mosca
    ports:
        - 1883:1883

mqttbridge:
    image: stjohnjohnson/smartthings-mqtt-bridge
    volumes:
        - ./mqtt-bridge:/config
    ports:
        - 8080:8080
    links:
        - mqtt

homeassistant:
    image: balloob/home-assistant
    ports:
        - 80:80
    volumes:
        - ./home-assistant:/config
        - /etc/localtime:/etc/localtime:ro
    links:
        - mqtt
This will start home-assistant, MQTT, and the Bridge, in dependency order. All config can reference the name of the docker container instead of using IP addresses (e.g. mqtt for the broker host in Home Assistant).
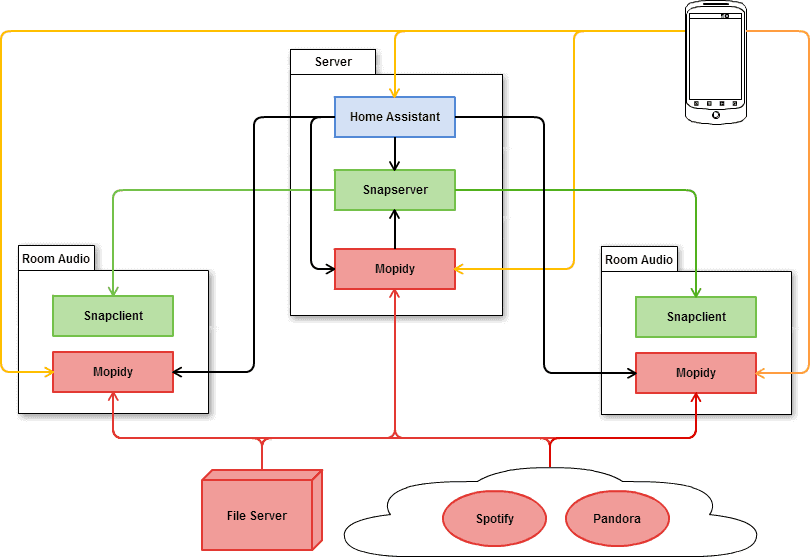
How it works
HTTP Endpoint: There are really only 2 ways to communicate with the SmartThings hub that we could find. The easiest approach is to create a RESTful SmartApp authenticated with OAuth that provides state changes via HTTP directly. This approach is pretty straightforward to implement, but it requires communication with the SmartThings cloud service, and can’t be done entirely on your LAN. We hoped to keep all communication internal, and came up with a second approach.
Custom Device Type: SmartThings custom device types allow developers to define handlers for HTTP events received directly over the local network by the SmartThings hub. Messages received are authenticated by MAC address, and can contain arbitrary strings in their payload. Since a Device Type is only ever tied to a single device, we need to add a SmartApp to the mix in order to translate events between individual devices and our special Home Assistant Bridge device. Here is what we have so far:
Z-Wave Switch        |
Zigbee motion sensor |<---> Bridge App <---> Bridge Device Type <---> <Local network>
Z-Wave light bulb    |
On the Home Assistant side, there is a powerful platform available based on the MQTT lightweight message bus protocol. Everything from lights to switches to temperature sensors can be defined in Home Assistant as an MQTT component, so it makes for a convenient integration point. This requires an MQTT broker for handling the message bus, and one last piece to translate between the HTTP that SmartThings supports and MQTT.
Here is the final sequence of events:
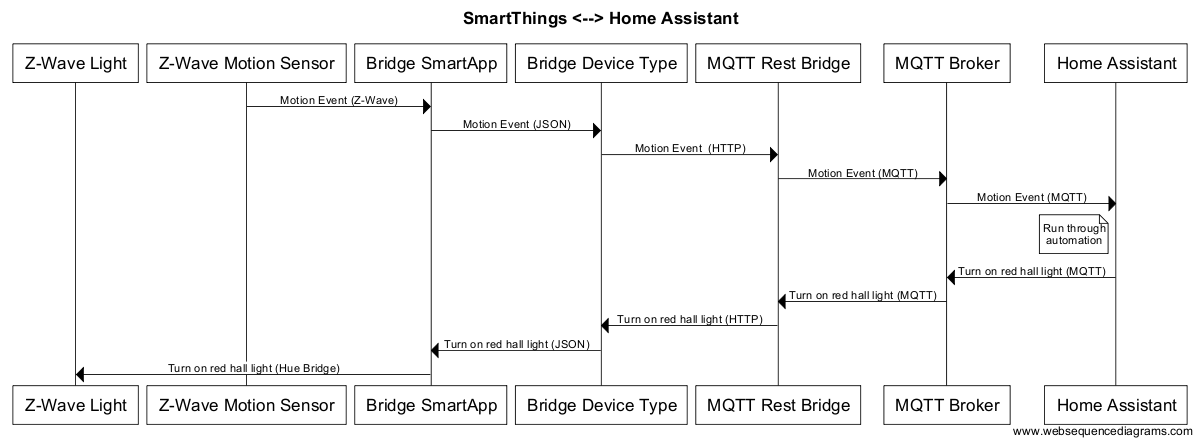 SmartThings Bridge Sequence
There are a lot of stops along the way for these events, but each piece is a simple translation layer to shuttle the events between systems.
Future Improvements
- Raspberry pi: There is a lot of interest in getting this running on the Raspberry Pi. It only requires binaries compiled for ARM, so we plan to get ARM-compatible versions of the containers going at some point.
- Authentication for MQTT: At the moment, the MQTT bridge doesn’t understand how to authenticate to MQTT, so only unauthenticated MQTT is supported. This is mitigated to some degree if you use our Docker Compose config, because MQTT’s port is not actually shared publicly.
- Authentication for MQTT Bridge: Right now the bridge expects that anyone subscribing is the SmartThings hub. This could use proper authentication.
]]>


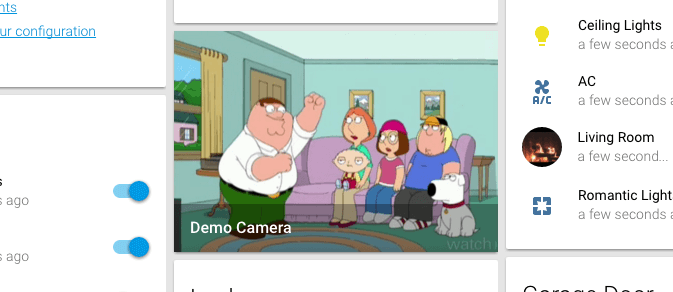 Camera feeds are now directly embedded in the frontend.
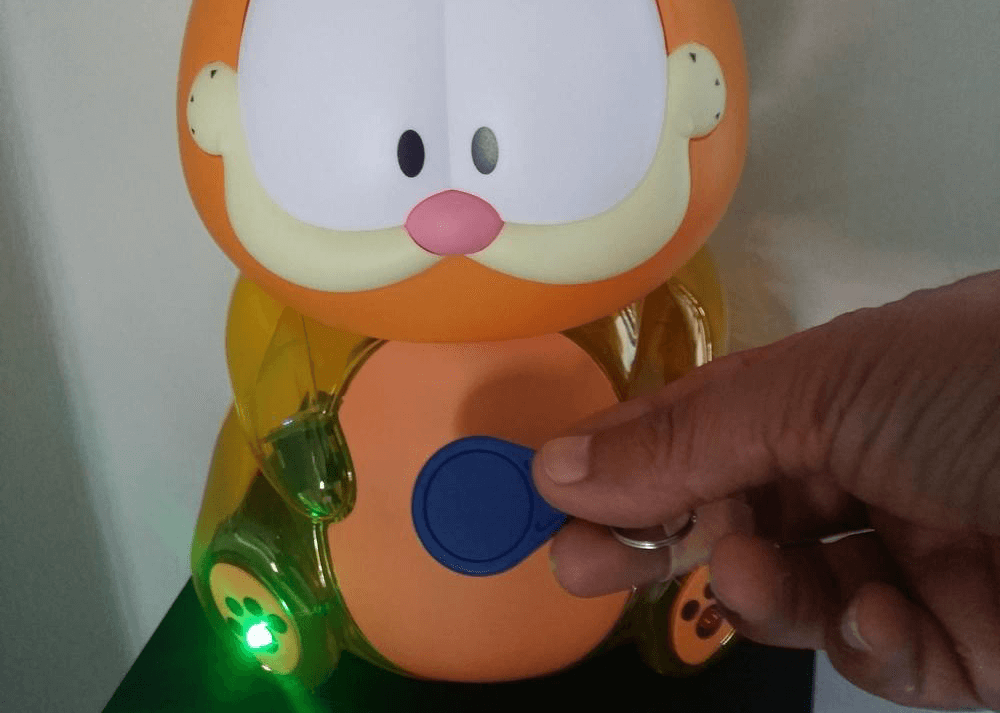 Hold your NFC tag against the belly of Garfield to unlock the alarm.
 Examples of the new


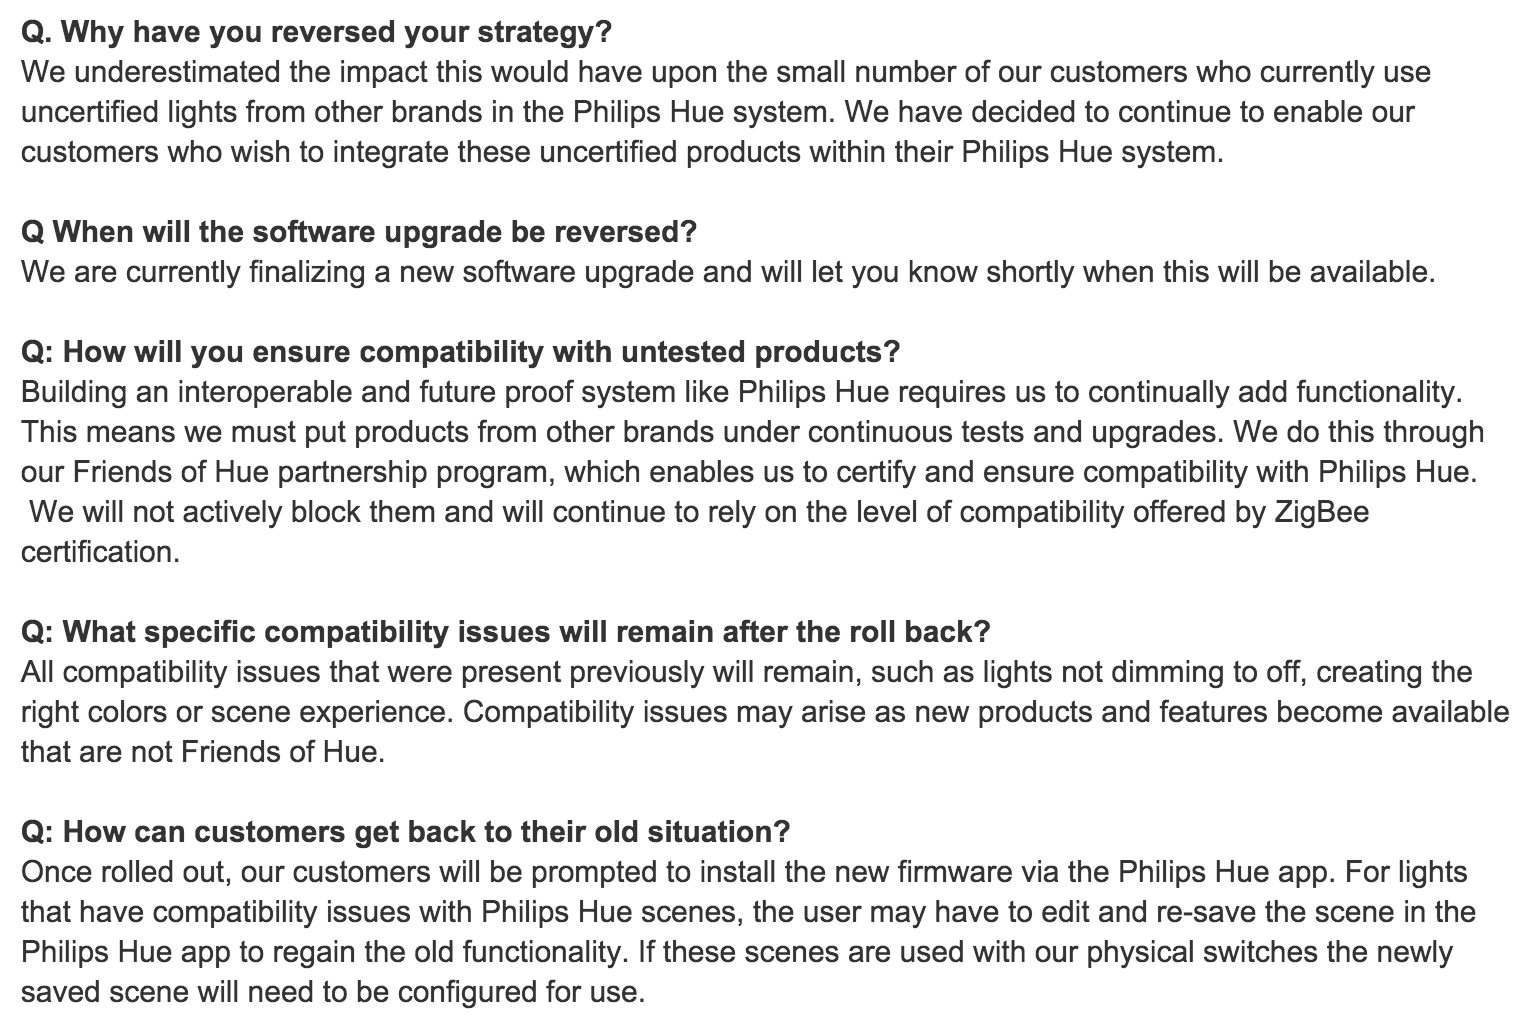 Philips Hue FAQ entries regarding reversing the decision.
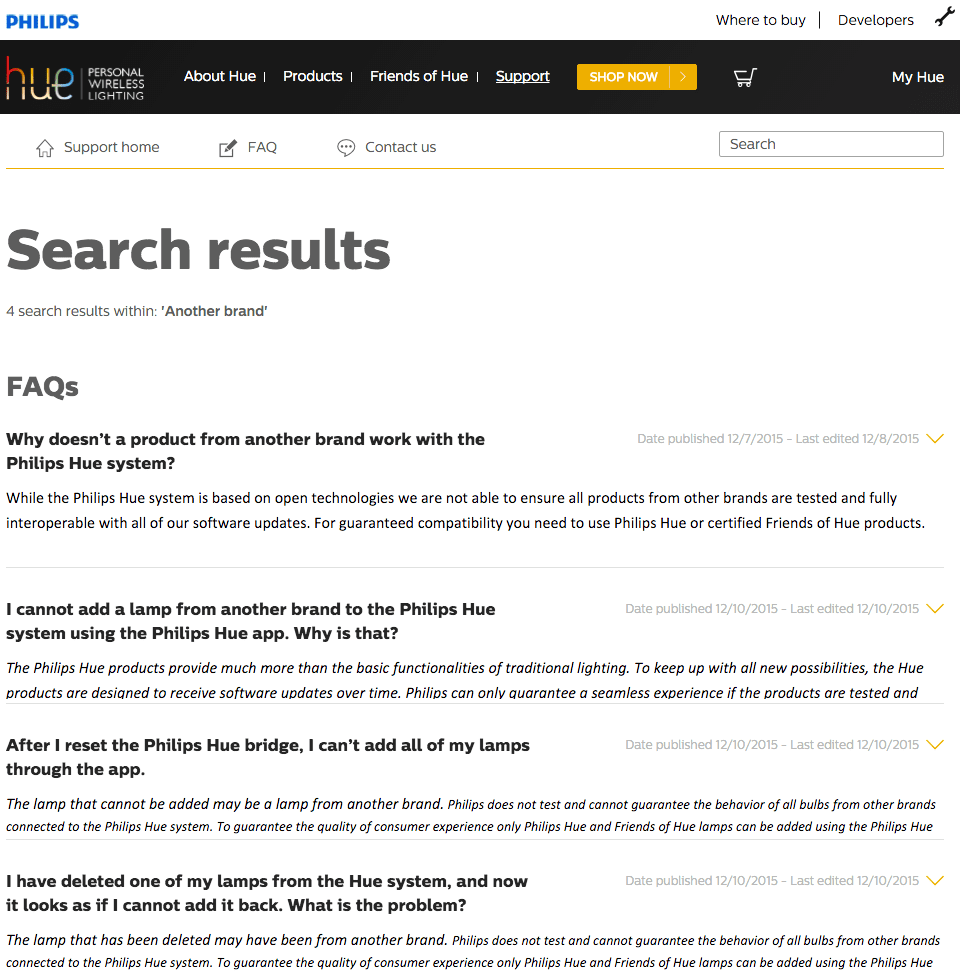
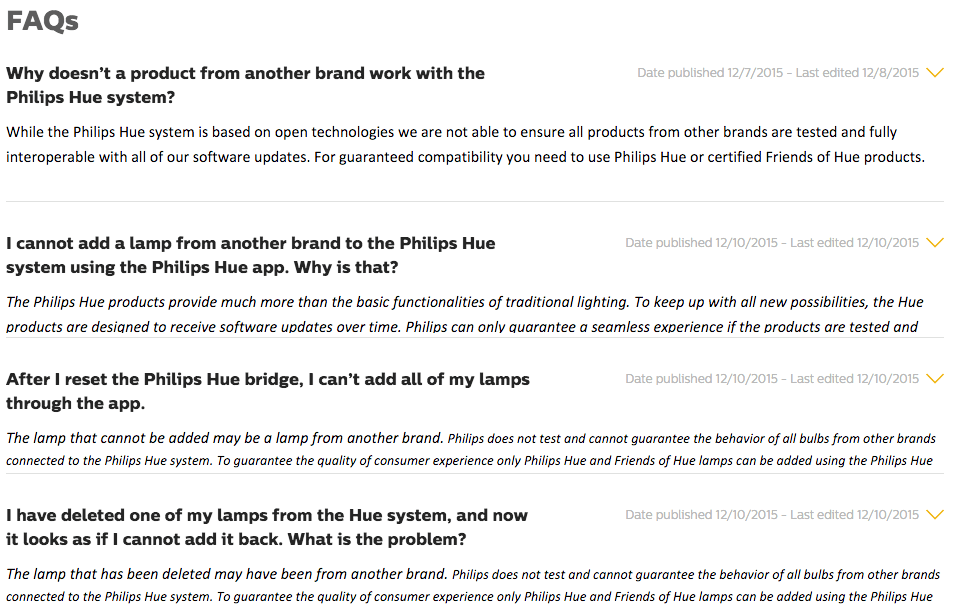 Philips Hue FAQ entries regarding 3rd party light bulbs.


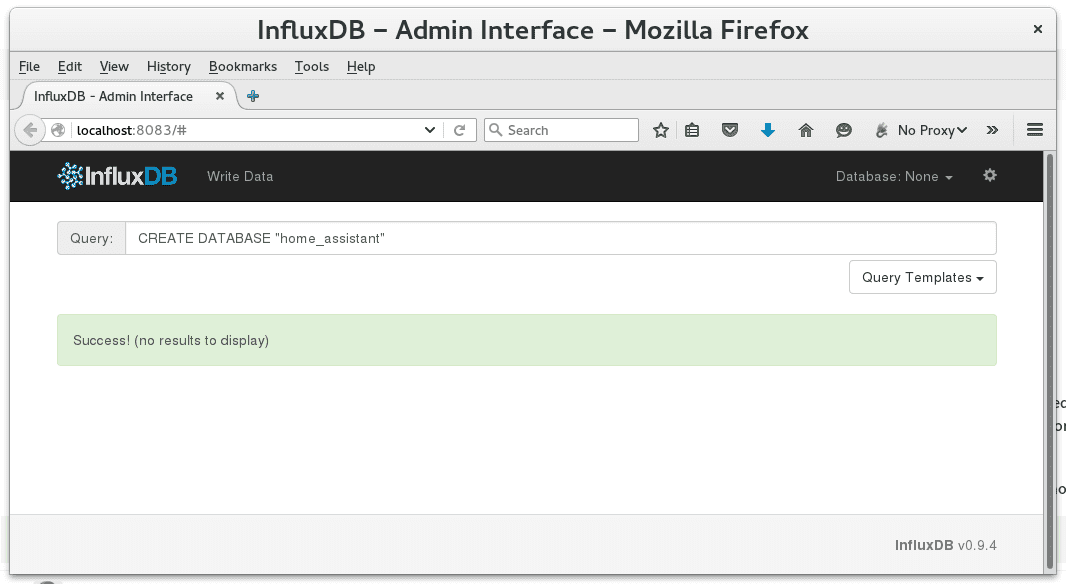 InfluxDB web frontend
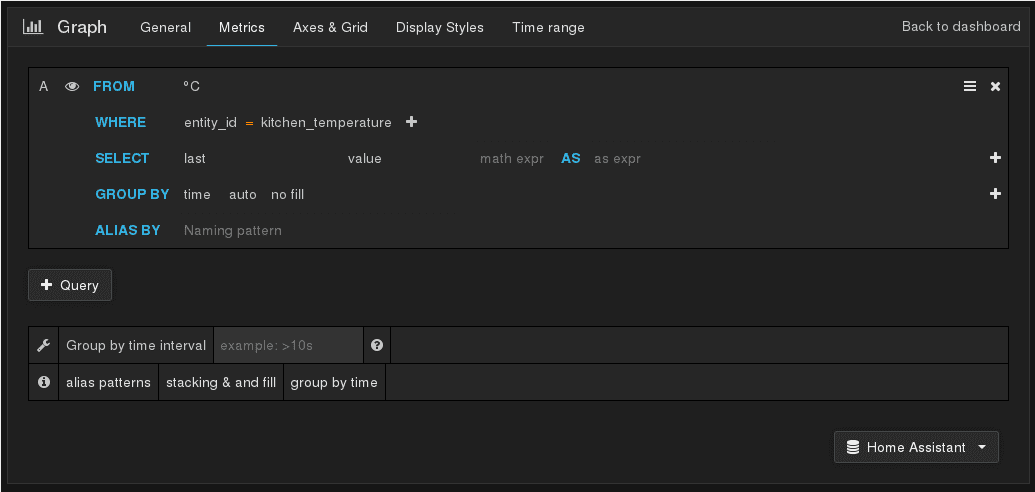 Grafana settings
 Grafana Temperature graph


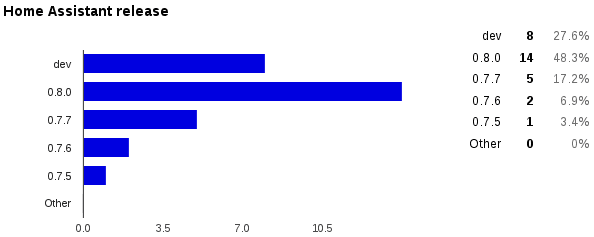 Around a week ago we started with the first survey. Now 30 people have participated. Thank you very much if you did. We think that’s enough time to have some “only partially representative” data. It’s hard to tell how many Home Assistant users are out there. Currently there are 215 members in our Gitter chat room and last week PyPI counted 5063 downloads.
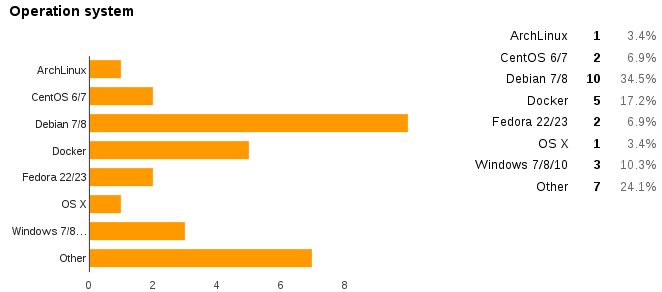 Operating systems
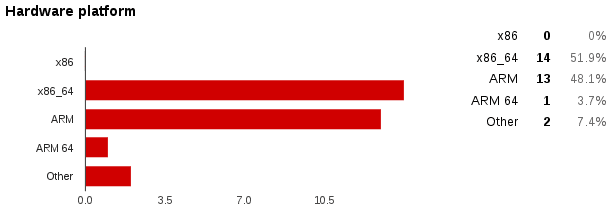 Hardware platforms
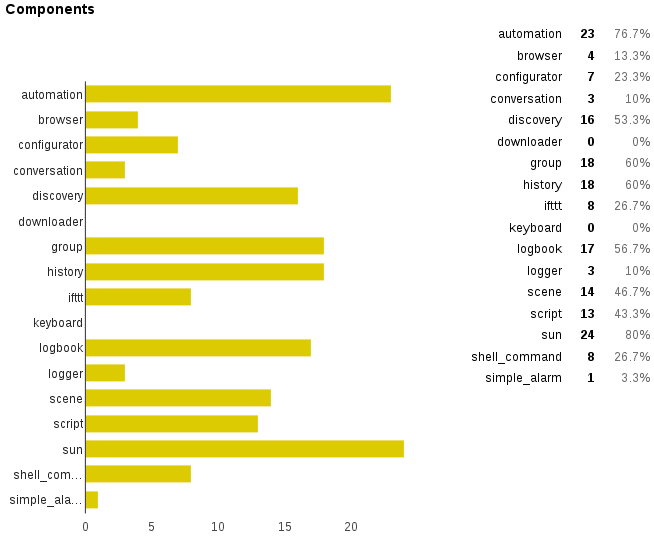 Components
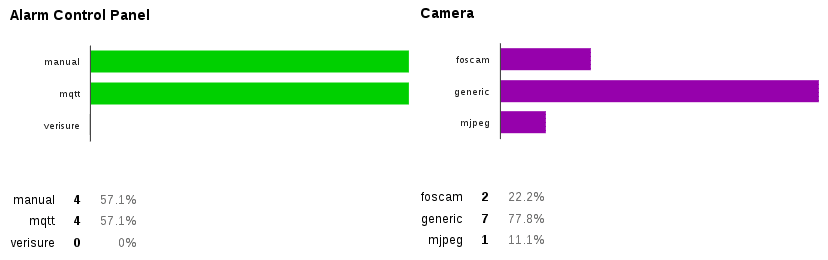 Alarm Control Panels and Cameras
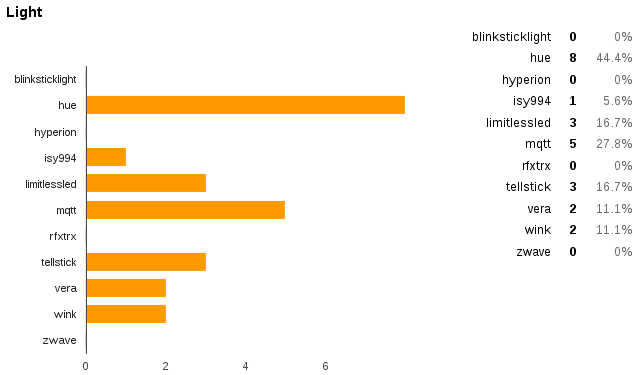 Lights
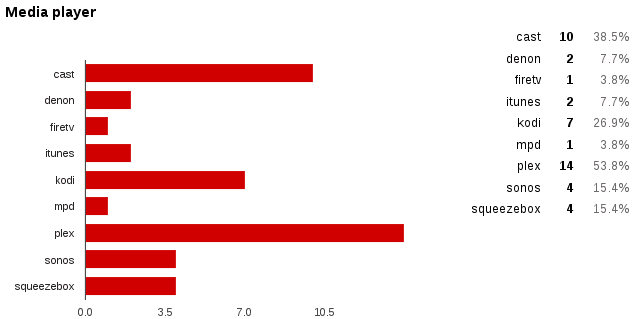 Media players
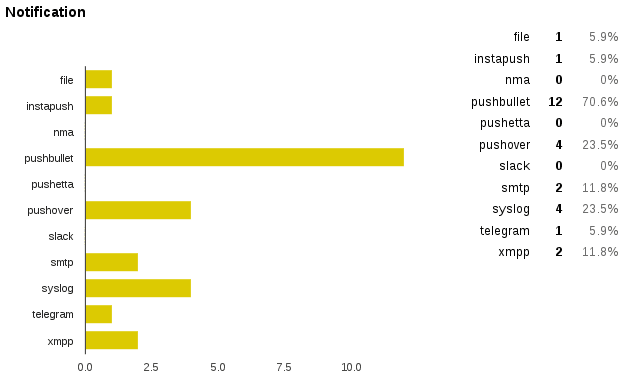 Notifications
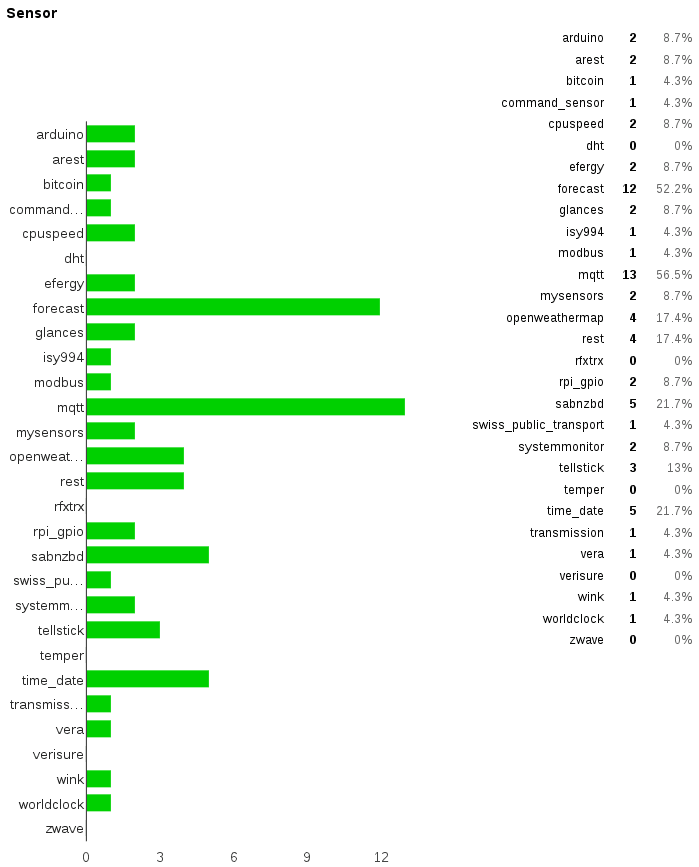 Sensors
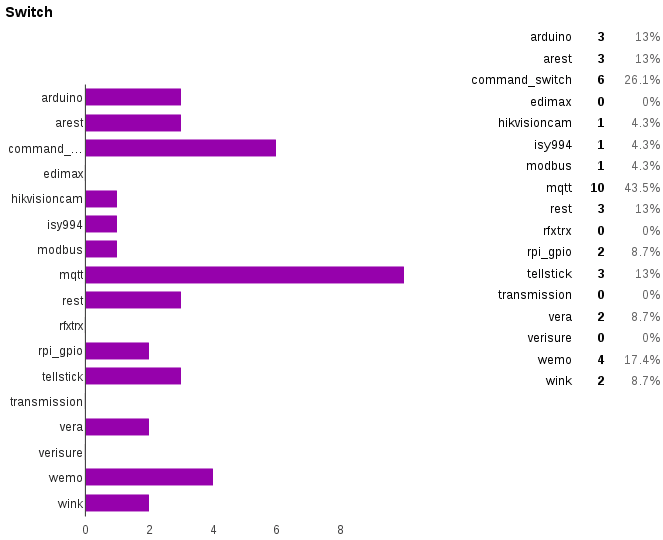 Switches
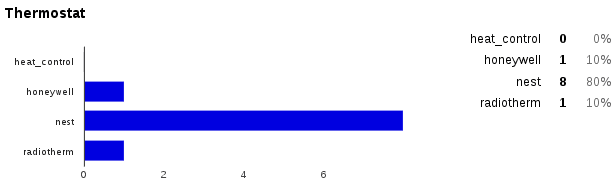 Thermostats


